Làm đăng nhập, đăng xuất với InertiaJS (Vue + Laravel)
Bài viết này mình sẽ hướng dẫn chi tiết làm chức năng đăng nhập , đăng xuất đơn giản với InertiaJS .

InertiaJS là gì
Theo như lời tác giả thì ông ấy muốn có một thứ gì đó có thể trộn lẫn được phần hay nhất của một app server-side và phần hay nhất của single-page-app. Và dựa trên mục đích ấy đã đưa ông ấy đến với ý tưởng một pattern khá thú vị - InertiaJS. Nói tóm lại thì tác đã tạo ra một thư viện lấy cảm hứng từ Turbolinks, giúp tạo ra các single page app có phần điều khiển máy chủ khá dễ dàng.
Ứng dụng làm phần đăng nhập, đăng xuất.
Mình sẽ tiến hành áp dụng thử InertiaJs với một project có phần server dùng framework laravel và phía client sử dụng VueJs
Cài đặt.
Đầu tiên là setup một project laravel, mình sẽ không nhắc lại các bước cơ bản nữa và đi vào thực hiện cài đặt thư viện inertia. Để thực hiện sử dụng Inertia trên server
composer require inertiajs/inertia-laravel.
Về phía client cụ thể là vue mình dùng npm
npm install inertiajs/inertia-vue --save
Rồi bình thường khi làm single page app, controller sẽ chỉ về một file app.blade có id là app sau đó thằng đó sẽ được render thành App component nhờ file app.js và nhiệm vụ của mình là dùng vue-router để xem với link tương ứng nào sẽ trả về component nào nhưng với Inertia thì mình sẽ không làm như vậy. Đại loại trên server sẽ gọi thẳng đến component luôn và nhiệm vụ ở app.js là xem xét xem controller gọi đến component nào thì render động thằng đó. Để làm cái này mình cần một thư viện là plugin-syntax-dynamic-import. Thằng này thực hiện import động component khi render ở file app.js
npm install @babel/core @babel/preset-env
npm install --save-dev @babel/plugin-syntax-dynamic-import
Và nhớ, thêm một file .babelrc ở dưới thư mục gốc của project có nội dung như sau
{
    "plugins": ["@babel/plugin-syntax-dynamic-import"]
}
À mình cần dùng thêm một thư viện nữa để từ file vue có thể dùng name của route gọi đến route thay vì phải dùng đường dẫn của nó như bình thường
composer require tightenco/ziggy
Với Inertia mình vẫn phải dùng đến một file blade cũng tương tự như với single page app thông thường.
<!DOCTYPE html>
<html>
<head>
    <meta charset="utf-8">
    <meta name="viewport" content="width=device-width, initial-scale=1.0, maximum-scale=1.0">
    <meta name="csrf-token" content={{ csrf_token() }}>
    <link href="{{ asset('css/app.css') }}" rel="stylesheet">
    <script src="{{ asset('js/app.js') }}" defer></script>
    @routes
</head>
<body>

@inertia

</body>
</html>
Lưu ý để có thể gọi route với tên của nó bên js cần đặt @route trên header, còn @inertia chỉ đơn giản là để tạo ra một base div, bao gồm thuộc tính data-page chứa thông tin bao đầu của page. Đại loại nó sẽ trông như sau
<div id="app" data-page="{{ json_encode($page) }}"></div>
Bước cuối cùng để hoàn thiện bước setup và đi vào thực hiện authenticate đó là chỉnh sửa file app.js
require('./bootstrap')

import Inertia from 'inertia-vue';
import Vue from 'vue';
import i18n from '@/i18n';

Vue.config.productionTip = false;
Vue.use(Inertia);

new Vue({
    i18n,
    render: h => h(Inertia, {
        props: {
            initialPage: JSON.parse(app.dataset.page),
            resolveComponent: (name) => {
                return import(`@_components/${name}`).then(module => module.default)
            }
        }
    })
}).$mount('#app');
Nhìn chung thì trong file này có phần đặc biệt nhất là render component cho vue. Cái ${name} chính là thằng truyền vào khi render từ controller. và từ đó ta sẽ lấy đường dẫn để import và render component chỉ định. À quên @_components là mình đã định danh cho thư mục components trong resource/js nhé. Bạn cũng nên sử dụng định danh này để sử dụng đường dẫn tuyệt đối đến các file vue hoặc js, css, scss trong project. Làm điều này cực kì dễ, thêm những dòng sau vào file webpack.mix.js
mix.webpackConfig({
    resolve: {
        extensions: ['.js', '.vue'],
        alias: {
            '@': path.resolve(__dirname, 'resources/js'),
            '@_components' : path.resolve(__dirname, 'resources/js/components'),
            'sass': path.resolve(__dirname, 'resources/sass'),
        }
    }
});
Ở trên đây mình đã thực hiện định danh cho ba thư mục resources/js, resources/js/components và resources/sass.
Thông thường với một single page app phía controller sẽ trả về api và các route sẽ được định nghĩa trong file api.php nhưng với inertia mọi thứ sẽ dễ dàng hơn nhiều, bạn có thể làm và trả về dữ liệu cho client một cách đơn giản y như bạn đang làm một cái web sử dụng blade của laravel vậy. Chính vì vậy phần đăng ký đăng nhập bạn hoàn toàn không cần sử dụng đến JWT mà sử dung phần đăng nhập đăng ký của Laravel hỗ trợ mà bên client vẫn có thể sử dụng được những thông tin về auth đó một cách đơn giản. Và như vậy các route bạn sẽ định nghĩa trong file web.php nhé.
Các bước cài đặt cơ bản đã xong bây giờ mình thực hiện làm thử nhé.
Phần đăng ký.
Route
Route::get('register', 'Auth\[email protected]')->name('register');
Route::post('register', 'Auth\[email protected]')->name('register.proccess');
Mình khá kém trong việc đặt tên mong các bạn thông cảm nhé.
Controller
Về cơ bản thì phần controller sẽ sử dụng lại các thành phần có trước trong laravel chỉ là thay vì trả về giao diện view('auth.register') thì mình dùng inertia để trả về. Trong RegisterController viết lại function showRegistrationForm như sau
    public function showRegistrationForm()
    {
        return Inertia::render('auth/Register');
    }
à đừng quên phải khai báo thằng Inertia nhé. không là nó không biết sử dụng cái gì đâu
use Inertia\Inertia;
Vue
Tạo thư mục mới tên là auth trong thư mục components. Sau đó tạo một file là Register.vue
Mình là người làm giao diện khá kém nên mình sẽ lên https://bootsnipp.com và kiếm về một cái giao diện để sử dụng nhé. Mình đã chọn được cái này https://bootsnipp.com/snippets/3522X. Nhiệm vụ là đưa phần html vào template và tạo một file scss để đưa css vào. Sau một hồi mò mẫm và đưa nó về với đúng dạng của vue để có thể sử dụng thì phần template sẽ trông như sau
<template>
  <div class="container h-100">
    <div class="d-flex justify-content-center h-100">
      <div class="user_card">
        <div class="d-flex justify-content-center">
            <div class="brand_logo_container">
                <img src="images/header.png" class="brand_logo" alt="Logo">
            </div>
        </div>
        <form @submit.prevent="submit">
          <div class="justify-content-center form_container text-center">
            <div class="input-group mb-3 col-md-10 ml-auto mr-auto">
              <div class="input-group-append">
                <span class="input-group-text"><i class="fa fa-user"></i></span>
              </div>
              <input v-model="form.name" type="name" class="form-control input-left-non-border" :class="{ error: errors.name }" :placeholder="$t('login.field.name')"/>
              <div v-if="errors.name" class="col-md-12 form-error text-left">{{ errors.name[0] }}</div>
            </div>
            <div class="input-group mb-3 col-md-10 ml-auto mr-auto">
              <div class="input-group-append">
                <span class="input-group-text"><i class="fa fa-user"></i></span>
              </div>
              <input v-model="form.email" type="email" class="form-control input-left-non-border" :class="{ error: errors.email }" :placeholder="$t('login.field.email')"/>
              <div v-if="errors.email" class="col-md-12 form-error text-left">{{ errors.email[0] }}</div>
            </div>
            <div class="input-group mb-3 col-md-10 ml-auto mr-auto">
              <div class="input-group-append">
                <span class="input-group-text"><i class="fa fa-lock"></i></span>
              </div>
              <input v-model="form.password" type="password" class="form-control input-left-non-border" :class="{ error: errors.password }" :placeholder="$t('login.field.password')"/>
              <div v-if="errors.password" class="col-md-12 form-error text-left">{{ errors.password[0] }}</div>
            </div>
            <div class="input-group mb-2 col-md-10 ml-auto mr-auto">
              <div class="input-group-append">
                <span class="input-group-text"><i class="fa fa-repeat"></i></span>
              </div>
              <input v-model="form.password_confirmation" type="password" class="form-control input-left-non-border" :class="{ error: errors.password_confirmation }" :placeholder="$t('login.field.password_confirmation')"/>
              <div v-if="errors.password_confirmation" class="col-md-12 form-error text-left">{{ errors.password_confirmation[0] }}</div>
            </div>
          </div>
          <div class="d-flex justify-content-center mt-3 login_container">
            <button type="submit" class="btn login_btn col-md-11">{{ $t('login.signUp') }}</button>
          </div>
        </form>
      </div>
    </div>
  </div>
</template>
À ở trên đây mình có dụng i18n cho vue các bạn có thể tham khải bài viết này của mình để hiểu hơn về cách sử dụng nhé https://viblo.asia/p/i18n-trong-vuejs-YWOZr8Dw5Q0
Trông loằng ngoằng trên kia nhưng thực chất nó sẽ chạy ra rất xấu đấy, cần phải thêm css cho nó nữa. Vì phần css khá dài nên mình sẽ không viết css vào trong file vue nữa trông sẽ cực kì kinh dị. Mình định nghĩa một file register.scss trong thư mục resources/sass và đưa toàn bộ css định nghĩa cho file trang Register vào trong này :
.user_card {
    height: 500px;
    width: 450px;
    margin-top: 100px;
    margin-bottom: auto;
    background: #fcc40e;
    position: relative;
    display: flex;
    justify-content: center;
    flex-direction: column;
    padding: 10px;
    box-shadow: 0 4px 8px 0 rgba(0, 0, 0, 0.2), 0 6px 20px 0 rgba(0, 0, 0, 0.19);
    -webkit-box-shadow: 0 4px 8px 0 rgba(0, 0, 0, 0.2), 0 6px 20px 0 rgba(0, 0, 0, 0.19);
    -moz-box-shadow: 0 4px 8px 0 rgba(0, 0, 0, 0.2), 0 6px 20px 0 rgba(0, 0, 0, 0.19);
    border-radius: 5px;

}
.brand_logo_container {
    position: absolute;
    height: 170px;
    width: 170px;
    top: -75px;
    border-radius: 50%;
    background: #60a3bc;
    padding: 10px;
    text-align: center;
}
.brand_logo {
    height: 150px;
    width: 150px;
    z-index: 1;
}
.form_container {
    margin-top: 100px;
}
.login_btn {
    width: 100%;
    background: #c0392b !important;
    color: white !important;
}
.login_btn:focus {
    box-shadow: none !important;
    outline: 0px !important;
}
.login_container {
    padding: 0 2rem;
}
.input-group-text {
    background: #c0392b !important;
    color: white !important;
    border: 0 !important;
    border-radius: 0.25rem 0 0 0.25rem !important;
}

.custom-checkbox .custom-control-input:checked~.custom-control-label::before {
    background-color: #c0392b !important;
}
Trong phần style của Regiser.vue import nội dung của nó vào như sau
<style lang="scss" scoped>
@import '~sass/login';

</style>
Mình import như vậy là đã có định danh cho thằng sass trong webpack.mix.js như phía trên rồi nhé.
Cuối cùng là đến đoạn script rồi. Đây mới là phần đáng lưu tâm khi nói về Inertia nè.
<script>
export default {
  data() {
    return {
      sending: false,
      form: {
        name: null,
        email: null,
        password: null,
				confirm_password: null,
			},
    }
  },
	mounted() {
		document.title = `Register | ${this.$page.app.name}`
	},
	props: {
		errors: {
			type: Object,
			default: () => { return {} }
		}
  },
	methods: {
		submit() {
			this.sending = true,
			this.$inertia.post(this.route('register'), {
                name: this.form.name
				email: this.form.email,
				password: this.form.password,
				password_confirmation: this.form.password_confirmation
			}).then(() => {
				this.sending = false
			})
		}
	}
}
</script>
Đại loại các phần hầu hết phần này đều viết như Vue thông thường như có hai điều đáng lưu tâm, thứ nhất mính đang dùng đến một cái biến this.$page.app.name: đây chính là một biến public được server trả về. Thứ hai đó là thay vì mình dùng axios để gọi đến server và nhận về một response dưới dạng json thì mình sử dụng this.$inertia.post.
Ví dụ với trường hợp phần thông tin gửi lên bị lỗi validator mọi thứ sẽ thật phức tạp khi bạn phải handle exception và viết nguyên một cái api validator exception trả về phía client. Client lại phải xử lý thông tin lỗi để hiện thị lên trên giao diện. Với cách gọi đến server của Inertia thế kia bạn chỉ việc share errors trong service provider và tạo props mới cũng là props thì đã xong. Hai thằng errors này sẽ được map với nhau khi bạn khai báo như vậy, và lỗi errors trả về từ server bây giờ đã là errors ở vue rồi. Lấy nó và in ra như blade phía trên thôi.
<?php

namespace App\Providers;

use Inertia\Inertia;
use Illuminate\Support\ServiceProvider;
use Illuminate\Support\Facades\Session;
use Illuminate\Support\Facades\Request;

class AppServiceProvider extends ServiceProvider
{
    /**
     * Register any application services.
     *
     * @return void
     */
    public function register()
    {
        Inertia::share('app.name', env('APP_NAME', 'Inertia '));
        Inertia::share('errors', function () {
            return Session::get('errors') ? Session::get('errors')->getBag('default')->getMessages() : (object) [];
        });

        Inertia::share('auth.user', function () {
            return auth()->user() ?? null;
        });
    }

    /**
     * Bootstrap any application services.
     *
     * @return void
     */
    public function boot()
    {
        //
    }
}
Ở phần script phía trên mình còn gọi đến một giá trị share khác của Inertia là $page.app.name, biến này còn có thể sử dụng cả trên blade để check điều kiện nữa. Điều này hỗ trợ bạn khá nhiều ví dụ như với blade của laravel bạn có thể lấy thông tin của thằng auth dễ dàng để làm layout thì bây giờ bạn cũng có thể làm điều hoàn toàn tương tự.
Trên đây là cách mà controller đưa thông tin public để nhiều trang khác nhau dưới client có thể sử dụng. Ngoài ra bạn có thể truyền dữ liệu từ controller xuống client như sau.
    public function index()
    {
        return Inertia::render('Organizations/Index', [
            'filters' => Request::all('search', 'trashed'),
            'organizations' => Auth::user()->account->organizations()
                ->orderBy('name')
                ->filter(Request::only('search', 'trashed'))
                ->paginate()
                ->only('id', 'name', 'phone', 'city', 'deleted_at'),
        ]);
    }
Rồi nhìn như trên thì để sử dụng được biến filters hay organizations bạn cũng chỉ cần khai báo thêm props filters và organizations ở Vue là được rồi. Cái này không liên quan đến project đâu, mình cho vào để các bạn biết thêm thôi :v.
Mình chạy thử thôi nhỉ.
Thử trường hợp lỗi trước nhé xem thằng errors chạy có ngon không? 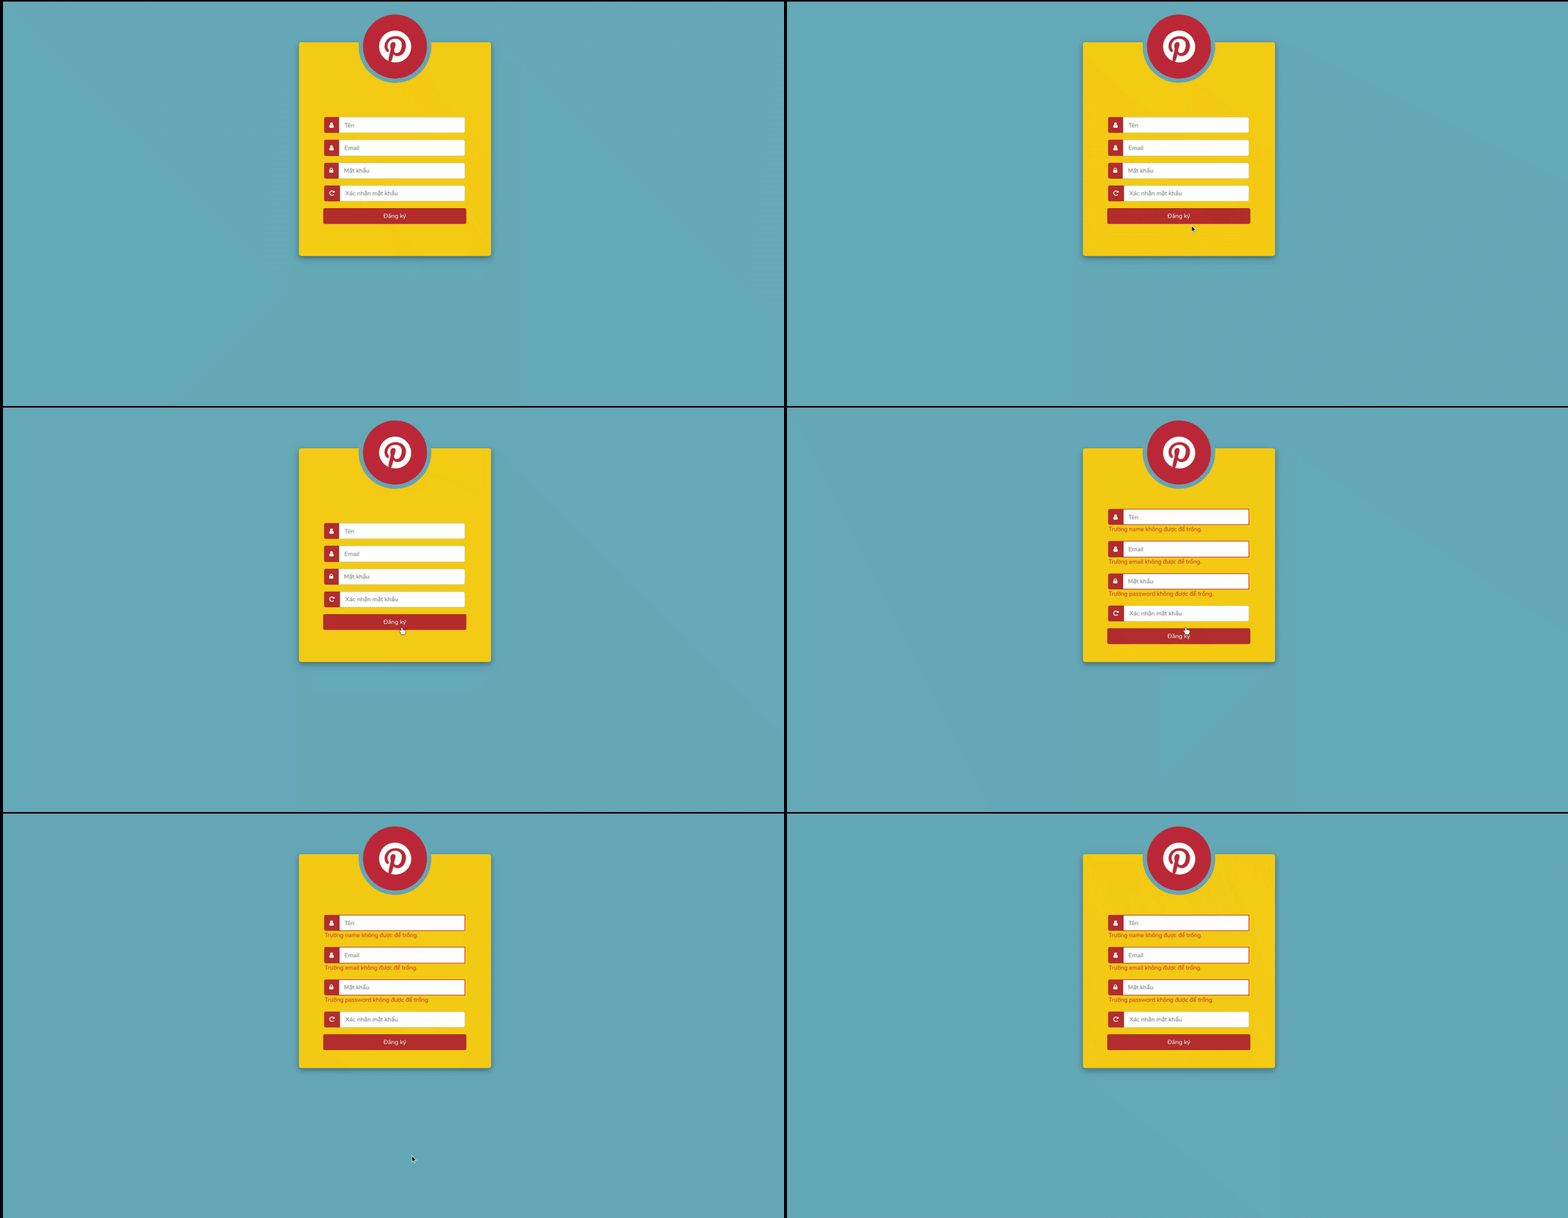 Có vẻ ổn rồi nhỉ. Đến trường hợp đăng ký thành công nhé.
  À quên khi đăng nhập thành công sẽ gọi đến trang chủ Home. Trong HomeController dùng inertia để đưa về Home vue như sau nhé
return Inertia::render('Home');
Rồi bây giờ mình sẽ đưa code phần đăng nhập và đăng xuất các bạn hãy tự ghép vào project của mình nhé.
    public function showLoginForm()
    {
        return Inertia::render('auth/Login');
    }
<template>
  <div class="container h-100">
    <div class="d-flex justify-content-center h-100">
      <div class="user_card">
        <div class="d-flex justify-content-center">
					<div class="brand_logo_container">
						<img src="images/Co-caro.png" class="brand_logo" alt="Logo">
					</div>
				</div>

					<form @submit.prevent="submit">
						<div class="justify-content-center form_container text-center">
							<div class="input-group mb-3 col-md-10 ml-auto mr-auto">
								<div class="input-group-append">
									<span class="input-group-text"><i class="fa fa-user"></i></span>
								</div>
								<input v-model="form.email" type="email" class="form-control input-left-non-border" :class="{ error: errors.email }" :placeholder="$t('login.field.email')"/>
								<div v-if="errors.email" class="col-md-12 form-error text-left">{{ errors.email[0] }}</div>
							</div>
							<div class="input-group mb-2 col-md-10 ml-auto mr-auto">
								<div class="input-group-append">
									<span class="input-group-text"><i class="fa fa-lock"></i></span>
								</div>
								<input v-model="form.password" type="password" class="form-control input-left-non-border" :class="{ error: errors.password }" :placeholder="$t('login.field.password')"/>
								<div v-if="errors.password" class="col-md-12 form-error text-left">{{ errors.password[0] }}</div>
							</div>
							<div class="form-group">
								<div class="custom-control custom-checkbox">
									<input type="checkbox" class="custom-control-input" id="customControlInline" v-model="form.remember">
									<label class="custom-control-label" for="customControlInline">{{ $t('login.rememberMe') }}</label>
								</div>
							</div>
						</div>
						<div class="d-flex justify-content-center mt-3 login_container">
							<button type="submit" class="btn login_btn col-md-11">{{ $t('login.login') }}</button>
						</div>
						<div class="mt-4">
							<div class="d-flex justify-content-center links">
								{{ $t('login.confirmHaveAccount') }}
								<inertia-link :href="route('register.index')" class="ml-2">{{ $t('login.signUp') }}</inertia-link>
							</div>
							<div class="d-flex justify-content-center links">
								<inertia-link href="#">{{ $t('login.forgotPassword') }}</inertia-link>
							</div>
						</div>
					</form>
      </div>
    </div>
  </div>
</template>

<script>
export default {
  data() {
    return {
      sending: false,
      form: {
        email: null,
        password: null,
				remember: null
			},
    }
  },
	mounted() {
		document.title = `Login | ${this.$page.app.name}`
	},
	props: {
		errors: Object,
  },
	methods: {
		submit() {
			this.sending = true,
			this.$inertia.post(this.route('login.attempt'), {
				email: this.form.email,
				password: this.form.password,
				remember: this.form.remember
			}).then(() => {
				this.sending = false
			})
		}
	}
}
</script>

<style lang="scss" scoped>
@import '~sass/register';
</style>
À thằng Login có dùng đến <inertia-link> nó cũng tương tự như Vue-Router thực hiện các yêu cầu XHR để tải trang được yêu cầu.
<inertia-link class="btn material-button option3 logout-icon" :href="route('logout')" method="post">
    <i class="fa fa-sign-out" aria-hidden="true"></i>
  </inertia-link>
Cuối cùng chúc bạn thực hiện thử với Inertia thành công nhé
Tài liệu tham khảo

Theo dõi VnCoder trên Facebook, để cập nhật những bài viết, tin tức và khoá học mới nhất!
