[Android] Realm Database - Giải pháp xử lý dữ liệu thay thế Sqlite trong Android
Realm database là một database dành cho thiết bị di động đầu tiên được xây dựng từ nền tảng cho phép chạy trực tiếp trong điện thoại, máy tính bảng và các thiết bị đeo được. Realm có một slogan rất hay: “database tốt hơn, nhanh hơn, đơn giản hơn và Java-native “. Dễ dàng nhận ra các từ “tốt hơn, nhanh hơn và đơn giản hơn” với ngụ ý so sánh giữa Relam và SQLite cho Android. Trong khi SQLite vẫn đang là sự lựa chọn mặc định từ xưa đến nay và vẫn sẽ tiếp tục phát triển.

I. Realm database trong Android hoạt động như thế nào?
Realm hoạt động bằng cách lưu các Java objects trực tiếp vào disk thay vì phải mapping chúng sang một kiểu dữ liệu khác như SQLite đang làm.
Realm có thể map nhiều loại object khác nhau vào một file trên disk. Hay nói cách khác là Realms không có yêu cầu mapping riêng biệt mỗi Java objects đến phiên bản được lưu trữ trên disk.
Nó giống với triết lý: “cái bạn thấy là cái được lưu”. Nếu đối tượng được quản lý bởi Realm mà bị thay đổi bởi người dùng thì nó sẽ được tự động lưu vào database. Realm quản lý các objects giống như SQLite quản lý các bảng.
Để một Java class trở thành Realm managed, class đó phải extend từ RealmObject hoặc implement RealmModel Interface.
II. Thực hành Realm database trong Android với ứng dụng hiển thị danh ngôn
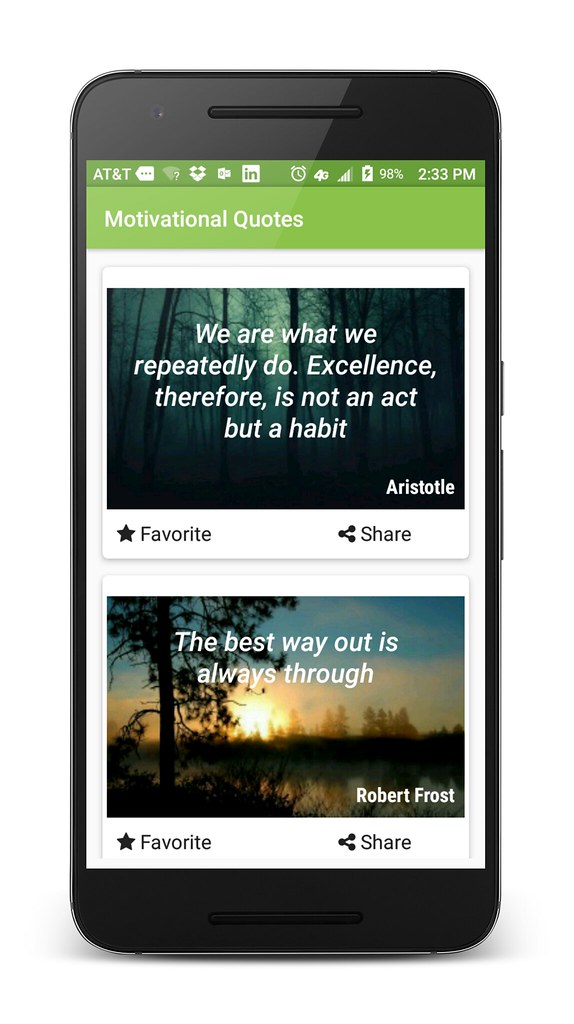
Để hiểu hơn về Realm database trong Android, chúng ta hãy tạo một ứng dụng demo đơn giản là hiển thị các câu danh ngôn được lưu trong database sử dụng Realm.
Ứng dụng sẽ có giao diện kiểu như sau:
1. Cài đặt Realm database trong Android
Thay SQLite bằng Realm database cũng rất đơn giản. Thêm Realm vào một Android project mới hoặc một dự án Android hiện có chỉ cần thực hiện các bước sau.
Đầu tiên, bạn thêm dependencies sau vào build.gradle:
buildscript {
    repositories {
        jcenter()
    }
    dependencies {
        classpath 'com.android.tools.build:gradle:2.2.3'
        classpath "io.realm:realm-gradle-plugin:2.3.1"
  }
}
Sau đó, bạn apply realm-android plugin vào đầu file build.gradle (trong thẻ application):
apply plugin: 'com.android.application'
apply plugin: 'realm-android'
Khi thay đổi build.gradle, bạn nhớ sync lại grade khi Android Studio yêu cầu nhé.
OK, đã hoàn thành bước đầu, bước tiếp theo là khởi tạo nó.
2. Khởi tạo cơ sở dữ liệu Realm database trong Android
Nơi tốt nhất để thực hiện việc khởi tạo này là trong một class extends từ Application.
Đối với dự án demo, mình thêm một class là ProntoQuoteApplication.java
Và để khởi tạo cơ sở dữ liệu realm, ta làm như sau:
public class ProntoQuoteApplication extends Application {

    @Override
    public void onCreate() {
        super.onCreate();
        if (LeakCanary.isInAnalyzerProcess(this)){
            return;
        }
        initRealm();
    }

    private void initRealm() {
        Realm.init(this);
        RealmConfiguration config = new RealmConfiguration.Builder()
                .name("prontoschool.realm")
                .schemaVersion(1)
                .deleteRealmIfMigrationNeeded()
                .build();
        Realm.setDefaultConfiguration(config);
}
Trong đoạn code trên, mình đã sử dụng RealmConfiguration object để truyền các tham số đến Realm.
Bước này thực ra chỉ là là optional thôi – nếu chúng ta không cấu hình database thì những thông số mặc định sẽ được sử dụng.
3. Tạo Realm Database table
Trong Realm không có khái niệm table như SQLite, thay vào đó chúng ta có Realm managed objects.
Cụm từ “creat tables” được sử dụng chỉ là do sự tương đồng mà thôi. Để tạo bảng hoặc các đối tượng tự động update, thì tất cả các model class phải được extends từ RealmObject class base .
Trong Realm cũng có thể xây dựng mối quan hệ một – nhiều. Ví dụ như ở app demo là mối quan hệ giữa: Author và Quote. Một author có thể có nhiều quotes nhưng một quote thì chỉ có một author:
public class Quote extends RealmObject{
      @PrimaryKey
      private long id;
      private String quote;
      private Author author;
      private Category category;
      private String quoteBackgroundImageUrl;
      private boolean isFavourite;
  }
  public class Author extends RealmObject{
      @PrimaryKey
      private long id;
      private String authorName;
      private String authorImageUrl;
      private RealmList<Quote> quotes;
    }
Bây giờ chúng ta có thể lưu các instances của các class này trực tiếp vào Realm database trong Android.
4. Các tạo Primary Key tự động tăng
Hiện tại, Realm không hỗ trợ primary key tự động tăng(auto increment). Vậy làm thế nào bây giờ?
Cách cheat đơn giản là chúng ta tăng giá trị primary key thủ công: Mình định nghĩa một biến tĩnh (static variable) kiểu AtomicLong trong ProntoQuoteApplication.java
Khi ứng dụng chạy, mình sẽ kiểm tra các bảng, managed object. Nếu nó đã được tạo, mình sẽ lấy được giá trị primary key tối đa của đối tượng đó và lưu nó trong biến AtomicLong.
Sau đó, mỗi khi tôi muốn lưu một đối tượng vào database, mình sẽ có primary key và tự động tăng giá trị nó lên rồi sử dụng nó cho lần tiếp theo.
Đây là cách thực hiện bằng code:
public class ProntoQuoteApplication extends Application {
    public static AtomicLong quotePrimaryKey;
    public static AtomicLong authorPrimaryKey;
    @Override
    public void onCreate() {
        super.onCreate();
        initRealm();
    }
    private void initRealm() {
        Realm.init(this);
        RealmConfiguration configuration  = new RealmConfiguration.Builder()
                .name(Constants.REALM_DATABASE)
                .schemaVersion(1)
                .deleteRealmIfMigrationNeeded()
                .build();
        //Now set this config as the default config for your app
        //This way you can call Realm.getDefaultInstance elsewhere
        Realm.setDefaultConfiguration(configuration);
        //Get the instance of this Realm that you just instantiated
        //And use it to get the Primary Key for the Quote and Category Tables
        Realm realm = Realm.getInstance(configuration);
        try {
            //Attempt to get the last id of the last entry in the Quote class and use that as the
            //Starting point of your primary key. If your Quote table is not created yet, then this
            //attempt will fail, and then in the catch clause you want to create a table
            quotePrimaryKey = new AtomicLong(realm.where(Quote.class).max("id").longValue() + 1);
        } catch (Exception e) {
            //All write transaction should happen within a transaction, this code block
            //Should only be called the first time your app runs
            realm.beginTransaction();
            //Create temp Quote so as to create the table
            Quote quote = realm.createObject(Quote.class, 0);
            //Now set the primary key again
            quotePrimaryKey = new AtomicLong(realm.where(Quote.class).max("id").longValue() + 1);
            //remove temp quote
            RealmResults<Quote> results = realm.where(Quote.class).equalTo("id", 0).findAll();
            results.deleteAllFromRealm();
            realm.commitTransaction();
        }
        try {
            //Attempt to get the last id of the last entry in the Author class and use that as the
            //Starting point of your primary key. If your Author table is not created yet, then this
            //attempt will fail, and then in the catch clause you want to create a table
            authorPrimaryKey = new AtomicLong(realm.where(Author.class).max("id").longValue() + 1);
        } catch (Exception e) {
            //All write transaction should happen within a transaction, this code block
            //Should only be called the first time your app runs
            realm.beginTransaction();
            //Create temp Author so as to create the table
            Author author = realm.createObject(Author.class, 0);
            //Now set the primary key again
            authorPrimaryKey = new AtomicLong(realm.where(Author.class).max("id").longValue() + 1);
            //remove temp author
            RealmResults<Author> results = realm.where(Author.class).equalTo("id", 0).findAll();
            results.deleteAllFromRealm();
            realm.commitTransaction();
        }
    }
}
5. Mở và đóng Realm Instances
Với SQLite, bạn gọi hàm getWritableDatabase() hay getReadableDatabase() nếu muốn tạo một instance của SQLiteDatabase khi truy xuất vào database .
Với Realm, cũng tương tự, bạn gọi Realm.getDefaultInstance() để khởi tạo instance của Realm.
Tương tự với SQLite, khi bạn kết thúc việc truy xuất vào database thì nên close nó lại để bộ nhớ được giải phóng.
public void onDestroy() {
    if (!realm.isClosed()) {
        realm.close();
    }
    super.onDestroy();
6. Cách thêm dữ liệu vào Realm database trong Android
Để thêm dữ liệu mới vào Realm database trong Android, bạn sử dụng Realm managed object. Và để đạt hiệu quả, đối tượng này phải được đính kèm trong một transaction.
Ví dụ, đây là cách để lưu một Quote vào database.
public void addAsync(final Quote quote,  final String authorName) {
        final Realm insertRealm = Realm.getDefaultInstance();
        final long id = ProntoQuoteApplication.quotePrimaryKey.getAndIncrement();
        insertRealm.executeTransactionAsync(new Realm.Transaction() {
            @Override
            public void execute(Realm backgroundRealm) {
                final Author author = createOrGetAuthor(authorName, backgroundRealm);
                Quote savedQuote = backgroundRealm.createObject(Quote.class, id);
                savedQuote.setQuote(quote.getQuote());
                savedQuote.setAuthor(author);
                savedQuote.setQuoteBackgroundImageUrl(quote.getQuoteBackgroundImageUrl());
                savedQuote.setFavourite(quote.isFavourite());
            }
        }
   }
7. Truy xuất để lấy dữ liệu từ Realm database
Query để lấy dữ liệu trong Realm rất đơn giản và hiệu suất cũng rất tốt.
Để query trong Realm, chúng ta sử dụng một Fluent interface để construct các queries với nhiều điều kiện khác nhau. Bạn có thể xây dựng lệnh query bằng String hoặc sử dụng RealmQuery để construct các lệnh query.
Kết quả lệnh query sẽ được trả về dưới dạng RealmResult<T>,trong đó T là một Realm managed.
Các Realm object được chứa trong RealmResult là các live objects. Bạn có thể thoải mái đọc các giá trị của bất kì object nào nhận được. Tuy nhiên nếu muốn update thì lại cần phải thực hiện thông qua một transaction.
Mình ví dụ một đoạn code để query database để lấy tất cả các quotes:
public List<Quote> getAllQuotes(Realm passedInRealm) {
        RealmResults<Quote> result = passedInRealm.where(Quote.class).findAll();
        return result;
    }
#8. Trong kiến trúc MVP thì thao tác với Realm sẽ code như thế nào?
Một trong những tính năng mạnh mẽ nhất của Realm database trong Android là tính động. Dữ liệu(object) được tự động cập nhật.
Nghĩa là khi một dữ liệu(hay nói cách khác là object) bị thay đổi thì nó lập tức được cập nhật vào disk và thông báo cho tất cả các listener của object đó. Và đây lại là một điều khó khăn khi muốn apply một kiến trúc như MVP khi sử dụng Realm.
Lý do là mỗi khi update vào Realm managed thì lại cần một transaction. Nghĩa là bạn sẽ phải code việc update này trong Activity hay Fragment. Mà với mô hình MVP thì người ta lại muốn tách phần Model(thao tác với database) ra khỏi phần View(Activity/Fragment).
Tuy nhiên, vẫn không phải là không có cách. Mình sẽ phải cập nhật các object thủ công, thông qua các interface. Các bạn tham khảo đoạn code bên dưới:
public interface OnDatabaseOperationCompleteListener {
    void onSaveOperationFailed(String error);
    void onSaveOperationSucceeded(long id);
    void onDeleteOperationCompleted(String message);
    void onDeleteOperationFailed(String error);
    void onUpdateOperationCompleted(String message);
    void onUpdateOperationFailed(String error);
}
Với các interface trên, đây là cách tôi lưu một Author vào trong database.
public void saveAsync(final Author author, final OnDatabaseOperationCompleteListener listener) {
        final Realm insertRealm = Realm.getDefaultInstance();
        final long id = ProntoQuoteApplication.authorPrimaryKey.incrementAndGet();
        insertRealm.executeTransactionAsync(new Realm.Transaction() {
            @Override
            public void execute(Realm backgroundRealm) {
                Author author1 = backgroundRealm.createObject(Author.class, id);
                author1.updateToRealm(author);
            }
        }, new Realm.Transaction.OnSuccess() {
            @Override
            public void onSuccess() {
                insertRealm.close();
                listener.onSaveOperationSucceeded(id);
            }
        }, new Realm.Transaction.OnError() [{]()
            @Override
            public void onError(Throwable error) {
                insertRealm.close();
                listener.onSaveOperationFailed(error.getMessage());
            }
        });
    }
Với kiến trúc MVP, thì tầng View tốt nhất là không cần quan tâm phía bên dưới chúng ta sử dụng SQLite hay Realm. Như vậy mới phát huy hết được sức mạnh của kiến trúc MVP.
Như vậy, mình đã giới thiệu cho các bạn những kiến thức cơ bản về Realm Database, một giải pháp nhằm thay thế Sqlite trong Android. Cảm ơn các bạn đã đọc.

Theo dõi VnCoder trên Facebook, để cập nhật những bài viết, tin tức và khoá học mới nhất!
Bài viết mới

Hướng dẫn xây dựng ứng dụng sử dụng API vân tay (FINGERPRINT API) để đăng nhập, đăng ký người dùng trong Android (P2)
