[Android] RecyclerView với nhiều kiểu item
RecyclerView với nhiều kiểu item (RecyclerView with multiple view type)

Hầu hết chúng ta đã quen thuộc với RecycleView có một kiểu item, tức là mỗi dòng có giao diện giống nhau, chỉ khác về dữ liệu hiển thị. Trong bài viết này, chúng ta sẽ cùng tìm hiểu cách triển khai RecyclerView với nhiều kiểu item.
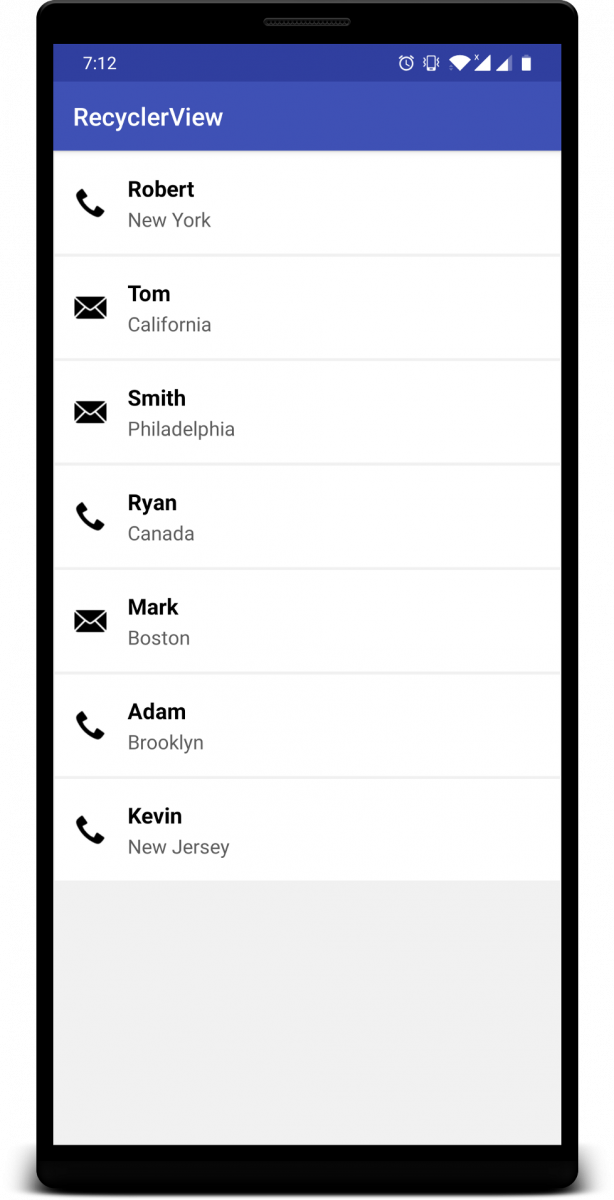
Ví dụ về Android RecyclerView với nhiều kiểu item.
- Bước 1: Tạo 2 file layout cho 2 kiểu item
item_call.xml
<?xml version="1.0" encoding="utf-8"?>
<LinearLayout xmlns:android="http://schemas.android.com/apk/res/android"
    android:layout_width="match_parent"
    android:layout_height="wrap_content"
    android:background="#ffffff"
    android:orientation="horizontal"
    android:layout_margin="1dp"
    android:padding="8dp">

    <ImageView
        android:id="@+id/imgCall"
        android:layout_width="26dp"
        android:layout_height="26dp"
        android:layout_gravity="center_vertical"
        android:layout_margin="8dp"
        android:src="@android:drawable/stat_sys_phone_call"
        android:tint="#000000" />

    <LinearLayout
        android:layout_width="match_parent"
        android:layout_height="wrap_content"
        android:orientation="vertical"
        android:padding="8dp">

        <TextView
            android:id="@+id/txtName"
            android:layout_width="match_parent"
            android:layout_height="wrap_content"
            android:padding="1dp"
            android:text="Robert"
            android:textColor="#000000"
            android:textSize="18sp"
            android:textStyle="bold" />

        <TextView
            android:id="@+id/txtAddress"
            android:layout_width="match_parent"
            android:layout_height="wrap_content"
            android:padding="1dp"
            android:text="Manhattan"
            android:textColor="#5d5d5d"
            android:textSize="16sp" />


    </LinearLayout>

</LinearLayout>
item_email.xml
<?xml version="1.0" encoding="utf-8"?>
<LinearLayout xmlns:android="http://schemas.android.com/apk/res/android"
    android:layout_width="match_parent"
    android:layout_height="wrap_content"
    android:background="#ffffff"
    android:orientation="horizontal"
    android:layout_margin="1dp"
    android:padding="8dp">

    <ImageView
        android:id="@+id/imgMail"
        android:layout_width="26dp"
        android:layout_height="26dp"
        android:layout_gravity="center_vertical"
        android:layout_margin="8dp"
        android:src="@android:drawable/ic_dialog_email"
        android:tint="#000000" />

    <LinearLayout
        android:layout_width="match_parent"
        android:layout_height="wrap_content"
        android:orientation="vertical"
        android:padding="8dp">

        <TextView
            android:id="@+id/txtName"
            android:layout_width="match_parent"
            android:layout_height="wrap_content"
            android:padding="1dp"
            android:text="Robert"
            android:textColor="#000000"
            android:textSize="18sp"
            android:textStyle="bold" />

        <TextView
            android:id="@+id/txtAddress"
            android:layout_width="match_parent"
            android:layout_height="wrap_content"
            android:padding="1dp"
            android:text="Manhattan"
            android:textColor="#5d5d5d"
            android:textSize="16sp" />

    </LinearLayout>

</LinearLayout>
- Bước 2: Tạo model
Chúng ta sử dụng chung lớp Employee cho cả 2 item. Lớp Employee gồm 2 trường số điện thoại và email. Nếu để trống điện thoại, điều đó có nghĩa là giá trị cho email là bắt buộc và ngược lại nếu giữ email trống, điều đó có nghĩa là giá trị của điện thoại là bắt buộc. Vì vậy, nếu điện thoại trống thì RecyclerView hiển thị giao diện người dùng email và nếu email trống thì RecyclerView hiển thị giao diện người dùng cuộc gọi.
ArrayList<Employee> employees = new ArrayList<>();

Employee employee = new Employee();
employee.setName("Robert");
employee.setAddress("New York");
employee.setPhone("+61234456");
employees.add(employee);

employee = new Employee();
employee.setName("Tom");
employee.setAddress("California");
employee.setEmail("tom_frank@gmail.com");
employees.add(employee);

employee = new Employee();
employee.setName("Smith");
employee.setAddress("Philadelphia");
employee.setEmail("smith_carrol@gmail.com");
employees.add(employee);

employee = new Employee();
employee.setName("Ryan");
employee.setAddress("Canada");
employee.setPhone("+612001456");
employees.add(employee);

employee = new Employee();
employee.setName("Mark");
employee.setAddress("Boston");
employee.setEmail("mark_walmerd@gmail.com");
employees.add(employee);

employee = new Employee();
employee.setName("Adam");
employee.setAddress("Brooklyn");
employee.setPhone("+61211780");
employees.add(employee);

employee = new Employee();
employee.setName("Kevin");
employee.setAddress("New Jersey");
employee.setPhone("+94221035");
employees.add(employee);
// set adapter
EmployeeAdapter adapter = new EmployeeAdapter(this, employees);
recyclerView.setLayoutManager(new LinearLayoutManager(this));
recylerView.setAdapter(adapter);
- Bước 3: Tạo adapter
Với RecyclerView thông thường chúng ta sử dụng adapter extends RecyclerView.Adapter<CustomViewHolder> nhưng đây là trường hợp có nhiều view holders nên chúng ta tạo adapter extends RecyclerView.Adapter<RecyclerView.ViewHolder>.
- getItemViewType()
private static int TYPE_CALL = 1;
private static int TYPE_EMAIL = 2;

@Override
public int getItemViewType(int position) {
    if (TextUtils.isEmpty(employees.get(position).getEmail())) {
        return TYPE_CALL;

    } else {
        return TYPE_EMAIL;
    }
}
- Tạo 2 view holder cho 2 item
class CallViewHolder extends RecyclerView.ViewHolder {

    private TextView txtName;
    private TextView txtAddress;

    CallViewHolder(@NonNull View itemView) {
        super(itemView);
        txtName = itemView.findViewById(R.id.txtName);
        txtAddress = itemView.findViewById(R.id.txtAddress);
    }
}
class EmailViewHolder extends RecyclerView.ViewHolder {

    private TextView txtName;
    private TextView txtAddress;

    EmailViewHolder(@NonNull View itemView) {
        super(itemView);
        txtName = itemView.findViewById(R.id.txtName);
        txtAddress = itemView.findViewById(R.id.txtAddress);
    }
}
- onCreateViewHolder
@NonNull
@Override
public RecyclerView.ViewHolder onCreateViewHolder(@NonNull ViewGroup viewGroup, int viewType) {
    View view;
    if (viewType == TYPE_CALL) { // for call layout
        view = LayoutInflater.from(context).inflate(R.layout.item_call, viewGroup, false);
        return new CallViewHolder(view);

    } else { // for email layout
        view = LayoutInflater.from(context).inflate(R.layout.item_email, viewGroup, false);
        return new EmailViewHolder(view);
    }
}
- onBindViewHolder
@Override
public void onBindViewHolder(@NonNull RecyclerView.ViewHolder viewHolder, int position) {
    if (getItemViewType(position) == TYPE_CALL) {
        ((CallViewHolder) viewHolder).setCallDetails(employees.get(position));
    } else {
        ((EmailViewHolder) viewHolder).setEmailDetails(employees.get(position));
    }
}

private void setCallDetails(Employee employee) {
    txtName.setText(employee.getName());
    txtAddress.setText(employee.getAddress());
}
private void setEmailDetails(Employee employee) {
    txtName.setText(employee.getName());
    txtAddress.setText(employee.getAddress());
}
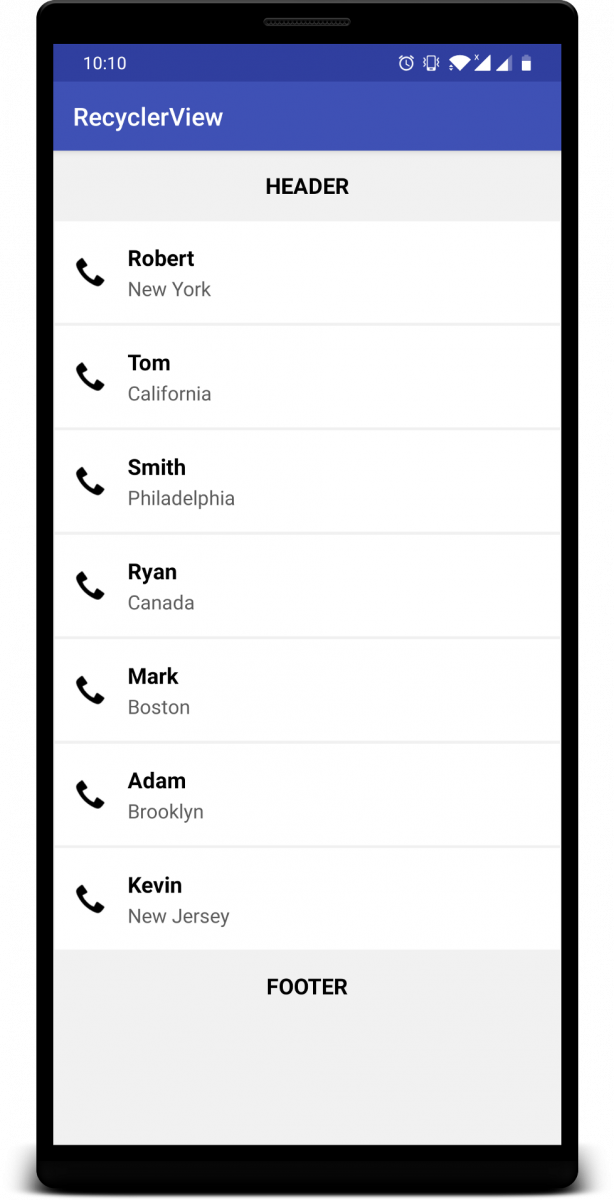
Bạn cũng có thể thêm header hay footer trong RecyclerView bằng tính năng này. Trong ví dụ dưới đây, chỉ có 3 loại item: header, footer và item call trong một recyclerview duy nhất bằng cách sử dụng nhiều kiểu item.
Chào thân ái và quyết thắng!
Link bài viết gốc: https://medium.com/@droidbyme/android-recyclerview-with-multiple-view-type-multiple-view-holder-af798458763b
Theo dõi VnCoder trên Facebook, để cập nhật những bài viết, tin tức và khoá học mới nhất!