[Android] Thiết kế giao diện động với MotionLayout
Với MotionLayout, bạn có thể tạo ra một phong cách hoàn toàn khác biệt và mượt mà cho ứng dụng của mình. Hãy quên những màn hình tĩnh khô cứng đi, thay vào đó là animation và các motion bắt mắt, gây thích thú cho người dùng, ngoài ra còn mang lại sự chuyên nghiệp cho ứng dụng của bạn.
Tại sao nên sử dụng MotionLayout?
Android framework đã cung cấp một vài cách để tạo animation như:
- Animated Vector Drawable
- Property Animation framework
- LayoutTransition animations
- Layout transitions with TransitionManager
- CoordinatorLayout
Vậy thay vì các lựa chọn này, tại sao chúng ta nên sử dụng MotionLayout để tạo animation?
- MotionLayout được tạo ra để thu hẹp khoảng cách giữa chuyển tiếp bố cục và xử lý chuyển động phức tạp.
- Có khả năng như một sự pha trộn giữa property animation framework, TransitionManager và CoordinatorLayout: Nó cho phép bạn mô tả quá trình chuyển đổi giữa hai bố cục (như TransitionManager), nhưng cũng có thể làm động bất kỳ thuộc tính nào (không chỉ thuộc tính bố cục) .
- Hỗ trợ xử lý chạm và keyframes, cho phép các lập trình viên dễ dàng tùy chỉnh các chuyển đổi theo nhu cầu của riêng họ.
- Với MotionLayout bạn có thể mô tả đầy đủ một chuyển động phức tạp trong XML mà không cần xử lý thêm bằng code.
Thêm MotionLayout vào build.gradle (Module: app)
implementation 'androidx.constraintlayout:constraintlayout:2.0.0-alpha2'
Ví dụ
Trong bài viết này, chúng ta sẽ cùng sử dụng MotionLayout để tạo ra animation như phía dưới
.gif)
Thêm MotionLayout vào ứng dụng của bạn
implementation 'com.android.support.constraint:constraint-layout:2.0.0-alpha2'
Thiết kế giao diện bắt đầu animation
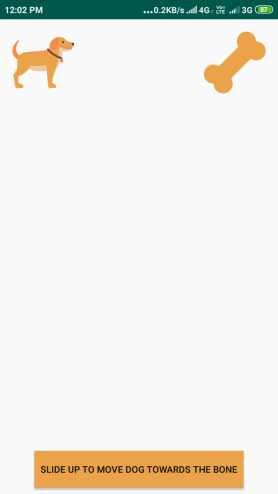
activity_motion_start.xml
<?xml version="1.0" encoding="utf-8"?>
<android.support.constraint.motion.MotionLayout
    xmlns:android="http://schemas.android.com/apk/res/android"
    xmlns:tools="http://schemas.android.com/tools"
    xmlns:app="http://schemas.android.com/apk/res-auto"
    android:layout_width="match_parent"
    android:layout_height="match_parent"
    app:layoutDescription="@xml/motion_scene">

    <ImageView
        android:id="@+id/movingImageView"
        android:layout_width="80dp"
        android:layout_height="80dp"
        android:src="@drawable/dog"
        android:layout_marginTop="16dp"
        android:layout_marginStart="16dp"
        app:layout_constraintTop_toTopOf="parent"
        app:layout_constraintStart_toStartOf="parent"/>

    <Button
        android:id="@+id/button"
        android:text="Slide Up to move dog towards the bone"
        android:layout_width="wrap_content"
        android:layout_height="wrap_content"
        android:clickable="false"
        android:background="#EBA34B"
        android:padding="8dp"
        android:layout_marginBottom="8dp"
        android:layout_marginStart="8dp"
        android:layout_marginEnd="8dp"
        app:layout_constraintBottom_toBottomOf="parent"
        app:layout_constraintEnd_toEndOf="parent"
        app:layout_constraintStart_toStartOf="parent"/>

    <ImageView
        android:id="@+id/staticImageView"
        android:src="@drawable/bone"
        android:layout_width="80dp"
        android:layout_height="80dp"
        android:layout_marginTop="16dp"
        android:layout_marginEnd="16dp"
        app:layout_constraintTop_toTopOf="parent"
        app:layout_constraintEnd_toEndOf="parent"/>

</android.support.constraint.motion.MotionLayout>
Thiết kế giao diện kết thúc animation
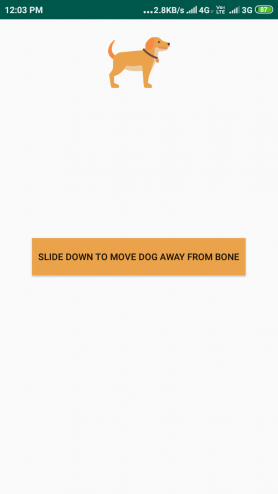
activity_motion_end.xml
<?xml version="1.0" encoding="utf-8"?>
<android.support.constraint.motion.MotionLayout
    xmlns:android="http://schemas.android.com/apk/res/android"
    xmlns:app="http://schemas.android.com/apk/res-auto"
    android:layout_width="match_parent"
    android:layout_height="match_parent">

    <ImageView
        android:id="@+id/movingImageView"
        android:layout_width="80dp"
        android:layout_height="80dp"
        android:src="@drawable/dog"
        android:layout_marginTop="16dp"
        android:layout_marginStart="16dp"
        android:layout_marginEnd="16dp"
        app:layout_constraintTop_toTopOf="parent"
        app:layout_constraintStart_toStartOf="parent"
        app:layout_constraintEnd_toEndOf="parent"/>

    <Button
        android:id="@+id/button"
        android:text="Slide Down to move dog away from bone"
        android:background="#EBA34B"
        android:layout_width="wrap_content"
        android:layout_height="wrap_content"
        android:padding="8dp"
        android:layout_marginBottom="8dp"
        android:layout_marginEnd="8dp"
        android:layout_marginStart="8dp"
        android:layout_marginTop="8dp"
        app:layout_constraintBottom_toBottomOf="parent"
        app:layout_constraintEnd_toEndOf="parent"
        app:layout_constraintStart_toStartOf="parent"
        app:layout_constraintTop_toTopOf="parent"/>

</android.support.constraint.motion.MotionLayout>
Tạo Motion Scene
Đây là file định nghĩa các chuyển động, hiệu ứng và các ràng buộc bắt đầu/kết thúc
res/xml/motion_scene.xml
<?xml version="1.0" encoding="utf-8"?>
<MotionScene
    xmlns:motion="http://schemas.android.com/apk/res-auto">

    <Transition
        motion:constraintSetStart="@layout/activity_motion_start"
        motion:constraintSetEnd="@layout/activity_motion_end"
        motion:duration="1000">

        <OnSwipe
            motion:touchAnchorId="@id/button"
            motion:touchAnchorSide="top"
            motion:dragDirection="dragUp"/>

    </Transition>

</MotionScene>
Ở đây chúng ta đã định nghĩa một hiệu ứng chuyển động với thời gian, các layout bắt đầu/kết thúc và một sự kiện vuốt trên button (hướng lên)
Cuối cùng, gắn MotionScene với giao diện chính activity_main
app:layoutDescription="@xml/motion_scene"
Hạn chế của MotionLayout
Chỉ nên sử dụng với số lượng view con ít và chỉ có khả năng tác động tới các view là view con trực tiếp của nó.
Khi nào nên sử dụng MotionLayout
Bạn có thể sử dụng MotionLayout khi bạn cần di chuyển, thay đổi kích thước hoặc làm động các thành phần UI thực tế mà người dùng cần tương tác như: nút, thanh tiêu đề,...
Cần chú ý rằng các chuyển động này nên phục vụ một mục đích đặc biệt, giúp người dùng hiểu ứng dụng của bạn đang làm gì và không nên sử dụng với mục đích chỉ để tạo các animation.
Cảm ơn các bạn đã đọc bài viết.
Chào thân ái và quyết thắng!
Theo dõi VnCoder trên Facebook, để cập nhật những bài viết, tin tức và khoá học mới nhất!