


- Bài 1: Giới thiệu Flutter
- Bài 2: Cài đặt Flutter
- Bài 3: Tạo ứng dụng Flutter đầu tiên
- Bài 4: Kiến trúc ứng dụng Flutter
- Bài 5: Giới thiệu ngôn ngữ Dart
- Bài 6: Widget trong Flutter
- Bài 7: Layout trong Flutter
- Bài 8: Gesture trong Flutter
- Bài 9: Quản lý trạng thái Sate trong Flutter
- Bài 10: Statefulwidget trong Flutter
- Bài 11: ScopedModel trong Flutter
- Bài 12: Navigator và Routing
- Bài 13: Animation
- Bài 14: Code với native Android
- Bài 15: Code với native IOS
- Bài 16: Giới thiệu về package
- Bài 17: REST API
- Bài 18: Khái niệm về Database
- Bài 19: Chuyển đổi ngôn ngữ
- Bài 20: Testing
- Bài 21: Xuất ứng dụng trong Flutter
- Bài 22: Công cụ phát triển
- Bài 23: Viết ứng dụng hoàn chỉnh
Bài 13: Animation - Học lập trình Flutter cơ bản
Đăng bởi: Admin | Lượt xem: 9504 | Chuyên mục: Android
Animation là một lớp trừu tượng và việc xử lý khá phức tạp. Nhưng thay vào đó, animation giúp nâng cao trải nghiệm của người dùng, giúp người dùng tương tác với giao diện một cách thoải mái, hứng thú và không gây nhàm chán. Chúng ta không thể phủ nhận tầm quan trọng của animation, một ứng dụng tuyệt vời không chỉ là một ứng dụng chạy nhanh, nhẹ mà yếu tố quan trọng đó là giao diện phải đẹp, đơn giản và hiệu ứng đa dạng.Flutter framework ghi nhận điều đó và đã cung cấp cho các lập trình viên các framework đơn giản và trực quan để dễ dàng phát triển tất các dạng Animation.
Giới thiệu:
Animation là quá trình thể hiện một loạt các hình ảnh trong một khoảng thời gian. Một vài điều quan trọng về Animation như sau :
- Animation có 2 giá trị đích : đầu và cuối. Ví dụ để hiệu ứng một widget biến mất thì giá trị đầu của nó có opacity( độ đục ) tuyệt đối và giá trị cuối có opacity bằng 0
- Giá trị trung gian có thể là tuyến tính( đường thẳng) hoặc không tuyến tính (đường cong) và nó có thể được cấu hình. Chúng ta hiểu rằng animation làm việc giống như được cấu hình. Với mỗi cấu hình khác nhau sẽ cho ra một kiểu animation khác nhau. Ví dụ một widget hiệu ứng mờ dần từ trái sang phải có thể cấu hình thành hiệu ứng nảy lên giống như quả bóng rồi dần dần biến mất
- Thời gian khi chạy animation có tác động đến tốc độ (nhanh hay chậm) của hiệu ứng
- Trong flutter , hệ thống animation không có bất kì animation cụ thể nào cả. Thay vào đó nó cung cấp duy nhất giá trị yêu cầu cho tất cả các frame để render hình ảnh
Lớp Animation:
Flutter animation dựa trên các đối tượng animation. Lõi của các lớp animation nó hoạt động như sau :
Animation:
Tạo ra giá trị và được thêm vào giữa hai số (bắt đầu và kết thúc animation). Các kiểu animation thường được sử dụng là:
Animation<double> : Thêm các giá trị giữa hai số thập phân
Animation<Color> : Thêm các màu vào giữa hai màu
Animation<Size> : Thêm kích thước vào giữa hai kích thước
AnimationController : Là một đối tượng animation đặc biệt dùng dể diều khiển các hiệu ứng của chính nó. Nó tạo ra các giá trị mới bất cứ khi nào ứng dụng sẵn sàng cho một frame mới.Ngoài ra nó còn hỗ trợ các animation tuyến tính với giá trị từ 0.0 đến 1.0
controller = AnimationController(duration: const Duration(seconds: 2), vsync: this);Ở đây, controller kiểm soát hiệu ứng trong khoảng thời gian animation hoạt động. vsynv là một tính năng đặc biệt được dùng để tối ưu hóa các nguồn sử dụng animation
CurvedAnimation
Nó cơ bản giống như AnimationController nhưng hỗ trợ animation phi tuyến tính( đường cong). CurvedAnimation có thể sử dụng cùng với đối tượng animation như sau :
controller = AnimationController(duration: const Duration(seconds: 2), vsync: this);
animation = CurvedAnimation(parent: controller, curve: Curves.easeIn)
Tween<T>
Được kế thừa từ Animatable<T> và tạo các giá trị bất kì khác 0 và 1 . Nó được sử dụng cùng với đối tượng animation bởi phương thức animate
AnimationController controller = AnimationController(
   duration: const Duration(milliseconds: 1000),
vsync: this); Animation<int> customTween = IntTween(
   begin: 0, end: 255).animate(controller);
Ngoài ra, Tween cũng có thể sử dụng cùng với CurvedAnimation như dưới đây :
AnimationController controller = AnimationController(
   duration: const Duration(milliseconds: 500), vsync: this);
final Animation curve = CurvedAnimation(parent: controller, curve: Curves.easeOut);
Animation<int> customTween = IntTween(begin: 0, end: 255).animate(curve);
Nhìn trên, controller thực tế là một animation controller, curve cung cấp các dạng phi tuyến tính và customTween để điều chỉnh giá trị trị từ 0 đến 255.
Bây giờ ta bắt đầu làm việc với Animation:
Đầu tiên , định nghia controller animation ở hàm initState trong StatefulWidget
AnimationController(duration: const Duration(seconds: 2), vsync: this);
animation = Tween<double>(begin: 0, end: 300).animate(controller);
controller.forward();
Thêm animation bằng listener, addListener để thay đổi trạng thái của widget
animation = Tween<double>(begin: 0, end: 300).animate(controller) ..addListener(() {
   setState(() {
      // The state that has changed here is the animation object’s value.
   });
});
-Xây dựng widget gồm hai hàm là hàm AnimatedWidget và AnimatedBuilder . Cả hai widget đều chấp nhận đối tượng animation và nhận giá trị hiện tại cần thiết cho animation
-Nhận các giá trị animation trong khi chạy các widget và sau đó sử dụng nó cho độ dài(height) và độ rộng(width) hoặc bất kì các thuộc tính liên quan thay vì các giá trị ban đầu
child: Container(
   height: animation.value,
   width: animation.value,
   child: <Widget>,
)
Làm việc với ứng dụng :
Bây giờ chúng ta sẽ tiến hành viết một ứng dụng đơn giản để hiểu về khái niệm animationtrong flutter framework nhé ^^
Các bạn quay lại bài trước để lấy assets cũng như ảnh ở bài 7 nhé, mình sẽ để link ảnh dưới đây(https://vncoder.vn/bai-hoc/layout-trong-flutter-225)
Mình tạo project với tên là flutter demo, sau đó xóa code mặc định, thêm import và hàm main cơ bản
import 'package:flutter/material.dart';
void main() => runApp(MyApp());
Tạo MyApp widget kế thừa từ StateFullWidget( widget sẽ thay đổi giao diện khi được rebuild)
class MyApp extends StatefulWidget {
   _MyAppState createState() => _MyAppState();
}
Tạo _MyAppState widget và implement initState, sau đó chúng ta thêm hàm dispose(đây là hàm đóng controller)
class _MyAppState extends State<MyApp> with SingleTickerProviderStateMixin {
   Animation<double> animation;
   AnimationController controller;
   @override void initState() {
      super.initState();
      controller = AnimationController(
         duration: const Duration(seconds: 10), vsync: this
      );
      animation = Tween<double>(begin: 0.0, end: 1.0).animate(controller);
      controller.forward();
   }
   // This widget is the root of your application.
   @override
   Widget build(BuildContext context) {
      controller.forward();
      return MaterialApp(
         title: 'Flutter Demo',
         theme: ThemeData(primarySwatch: Colors.blue,),
         home: MyHomePage(title: 'Product layout demo home page', animation: animation,)
      );
   }
   @override
   void dispose() {
      controller.dispose();
      super.dispose();
   }
}class _MyAppState extends State<MyApp> with SingleTickerProviderStateMixin {
   Animation<double> animation;
   AnimationController controller;
   @override void initState() {
      super.initState();
      controller = AnimationController(
         duration: const Duration(seconds: 10), vsync: this
      );
      animation = Tween<double>(begin: 0.0, end: 1.0).animate(controller);
      controller.forward();
   }
   // This widget is the root of your application.
   @override
   Widget build(BuildContext context) {
      controller.forward();
      return MaterialApp(
         title: 'Flutter Demo',
         theme: ThemeData(primarySwatch: Colors.blue,),
         home: MyHomePage(title: 'Product layout demo home page', animation: animation,)
      );
   }
   @override
   void dispose() {
      controller.dispose();
      super.dispose();
   }
}
Oke, mình cùng giải thích một tẹo về code đoạn code trên :
- Hàm initState được dùng để tạo đối tượng animation controller (controller), đối tượng animation(animation) và để bắt đầu với animation, chúng ta sử dụng phương thức controller.forward.
- Ở hàm dispose, như mình nói ở trên, sau khi tạo thì chúng ta phải hủy nó nên đó là chức năng của hàm dispose để hủy bỏ controller
- Ở hàm Build, animatio được gửi tới MyHomePage widget thông quan constructor. Bây giờ, MyHomePage có thể sử dụng đối tượng animation tạo hiệu ứng cho nội dung
- Giờ chúng ta sẽ tạo ProductBox widget
class ProductBox extends StatelessWidget {
   ProductBox({Key key, this.name, this.description, this.price, this.image})
      : super(key: key);
   final String name;
   final String description;
   final int price;
   final String image;

   Widget build(BuildContext context) {
      return Container(
         padding: EdgeInsets.all(2),
         height: 140,
         child: Card(
            child: Row(
               mainAxisAlignment: MainAxisAlignment.spaceEvenly,
               children: <Widget>[
                  Image.asset("assets/" + image),
                  Expanded(
                     child: Container(
                        padding: EdgeInsets.all(5),
                        child: Column(
                           mainAxisAlignment: MainAxisAlignment.spaceEvenly,
                           children: <Widget>[
                              Text(this.name, style:
                                 TextStyle(fontWeight: FontWeight.bold)),
                              Text(this.description),
                                 Text("Price: " + this.price.toString()),
                           ],
                        )
                     )
                  )
               ]
            )
         )
      );
   }
}
Tiếp theo chúng ta sẽ tạo widget mới có tên là MyAnimatedWidget với hiệu ứng đơn giản fade animation sử dụng opacity(độ đục)
class MyAnimatedWidget extends StatelessWidget {
   MyAnimatedWidget({this.child, this.animation});

   final Widget child;
   final Animation<double> animation;

   Widget build(BuildContext context) => Center(
   child: AnimatedBuilder(
      animation: animation,
      builder: (context, child) => Container(
         child: Opacity(opacity: animation.value, child: child),
      ),
      child: child),
   );
}
Nhìn trên, chúng ta đã sử dụng AniatedBuilder để tạo hiệu ứng. AniatedBuilder là mọt widget được sử dụng để build nội dung và hiệu ứng cùng một thời điểm. Nó cho phép đối tượng animation có thể lấy giá trị của animation hiện tại. Chúng ta sử dụng giá trị animation thông qua animation.value để set opacity(độ đục) của widget con. Và animation sẽ tác động lên child widget đang sử dụng opacity
Cuối cùng chúng ta sẽ tạo MyHomePage widget và sử dụng đối tượng animation để tạo hiệu ứng cho nội dung của ứng dụng
class MyHomePage extends StatelessWidget {
   MyHomePage({Key key, this.title, this.animation}) : super(key: key);

   final String title;
   final Animation<double>
   animation;

   @override
   Widget build(BuildContext context) {
      return Scaffold(
         appBar: AppBar(title: Text("Product Listing")),body: ListView(
            shrinkWrap: true,
            padding: const EdgeInsets.fromLTRB(2.0, 10.0, 2.0, 10.0),
            children: <Widget>[
               FadeTransition(
                  child: ProductBox(
                     name: "iPhone",
                     description: "iPhone is the stylist phone ever",
                     price: 1000,
                     image: "iphone.jpg"
                  ), opacity: animation
               ),
               MyAnimatedWidget(child: ProductBox(
                  name: "Pixel",
                  description: "Pixel is the most featureful phone ever",
                  price: 800,
                  image: "pixel.jpg"
               ), animation: animation),
               ProductBox(
                  name: "Laptop",
                  description: "Laptop is most productive development tool",
                  price: 2000,
                  image: "laptop.jpg"
               ),
               ProductBox(
                  name: "Tablet",
                  description: "Tablet is the most useful device ever for meeting",
                  price: 1500,
                  image: "tablet.jpg"
               ),
               ProductBox(
                  name: "Pendrive",
                  description: "Pendrive is useful storage medium",
                  price: 100,
                  image: "pendrive.jpg"
               ),
               ProductBox(
                  name: "Floppy Drive",
                  description: "Floppy drive is useful rescue storage medium",
                  price: 20,
                  image: "floppydrive.jpg"
               ),
            ],
         )
      );
   }
}
Ở đây chúng ta sử dụng FadeAnimation và MyAnimationWidget để tạo hiệu ứng cho 2 items đầu trong list các product. FadeAnimation được xây dựng trong lớp animation mà chúng ta đã từng tạo hiệu ứng cho widget con đang sử dụng opacity
Vậy là xong, dưới đây là toàn bộ code chúng ta đã hao
import 'package:flutter/material.dart';
void main() => runApp(MyApp());
class MyApp extends StatefulWidget {
_MyAppState createState() => _MyAppState();
}
class _MyAppState extends State<MyApp> with SingleTickerProviderStateMixin {
Animation<double> animation;
AnimationController controller;
@override
void initState() {
super.initState();
controller = AnimationController(
duration: const Duration(seconds: 10), vsync: this);
animation = Tween<double>(begin: 0.0, end: 1.0).animate(controller);
controller.forward();
}
// This widget is the root of your application.
@override
Widget build(BuildContext context) {
controller.forward();
return MaterialApp(
title: 'Flutter Demo', theme: ThemeData(primarySwatch: Colors.blue,),
home: MyHomePage(title: 'Product layout demo home page', animation: animation,)
);
}
@override
void dispose() {
controller.dispose();
super.dispose();
}
}
class MyHomePage extends StatelessWidget {
MyHomePage({Key key, this.title, this.animation}): super(key: key);
final String title;
final Animation<double> animation;
@override
Widget build(BuildContext context) {
return Scaffold(
appBar: AppBar(title: Text("Product Listing")),
body: ListView(
shrinkWrap: true,
padding: const EdgeInsets.fromLTRB(2.0, 10.0, 2.0, 10.0),
children: <Widget>[
FadeTransition(
child: ProductBox(
name: "iPhone",
description: "iPhone is the stylist phone ever",
price: 1000,
image: "iphone.jpg"
),
opacity: animation
),
MyAnimatedWidget(
child: ProductBox(
name: "Pixel",
description: "Pixel is the most featureful phone ever",
price: 800,
image: "pixel.jpg"
),
animation: animation
),
ProductBox(
name: "Laptop",
description: "Laptop is most productive development tool",
price: 2000,
image: "laptop.jpg"
),
ProductBox(
name: "Tablet",
description: "Tablet is the most useful device ever for meeting",
price: 1500,
image: "tablet.jpg"
),
ProductBox(
name: "Pendrive",
description: "Pendrive is useful storage medium",
price: 100,
image: "pendrive.jpg"
),
ProductBox(
name: "Floppy Drive",
description: "Floppy drive is useful rescue storage medium",
price: 20,
image: "floppydrive.jpg"
),
],
)
);
}
}
class ProductBox extends StatelessWidget {
ProductBox({Key key, this.name, this.description, this.price, this.image}) :
super(key: key);
final String name;
final String description;
final int price;
final String image;
Widget build(BuildContext context) {
return Container(
padding: EdgeInsets.all(2),
height: 140,
child: Card(
child: Row(
mainAxisAlignment: MainAxisAlignment.spaceEvenly,
children: <Widget>[
Image.asset("assets/" + image),
Expanded(
child: Container(
padding: EdgeInsets.all(5),
child: Column(
mainAxisAlignment: MainAxisAlignment.spaceEvenly,
children: <Widget>[
Text(
this.name, style: TextStyle(
fontWeight: FontWeight.bold
)
),
Text(this.description), Text(
"Price: " + this.price.toString()
),
],
)
)
)
]
)
)
);
}
}
class MyAnimatedWidget extends StatelessWidget {
MyAnimatedWidget({this.child, this.animation});
final Widget child;
final Animation<double> animation;
Widget build(BuildContext context) => Center(
child: AnimatedBuilder(
animation: animation,
builder: (context, child) => Container(
child: Opacity(opacity: animation.value, child: child),
),
child: child
),
);
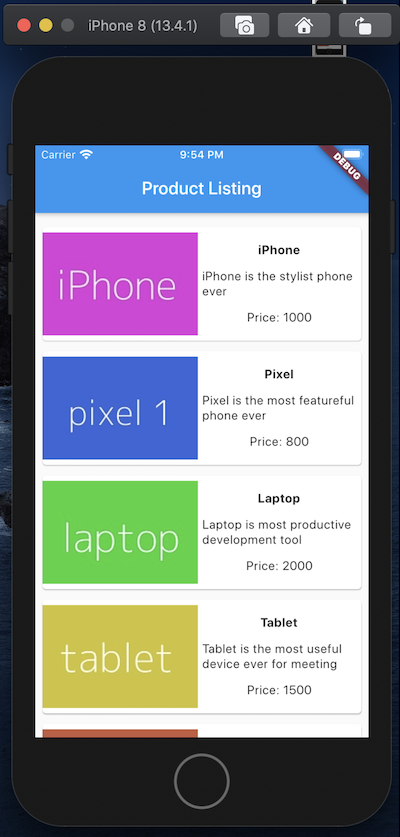
}Sau khi hoàn thành và chạy ứng dụng thì ta sẽ có kết quả như dưới đây
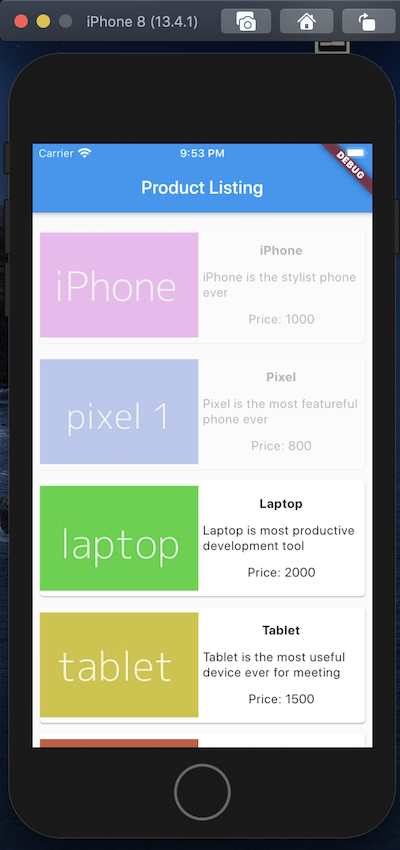
Không quá khó phải không nào, hy vọng các bạn hiểu được bài hôm nay và có thể tự tạo animation riêng cho mình. Chúc các bạn thành công ^^
Theo dõi VnCoder trên Facebook, để cập nhật những bài viết, tin tức và khoá học mới nhất!
- Bài 1: Giới thiệu Flutter
- Bài 2: Cài đặt Flutter
- Bài 3: Tạo ứng dụng Flutter đầu tiên
- Bài 4: Kiến trúc ứng dụng Flutter
- Bài 5: Giới thiệu ngôn ngữ Dart
- Bài 6: Widget trong Flutter
- Bài 7: Layout trong Flutter
- Bài 8: Gesture trong Flutter
- Bài 9: Quản lý trạng thái Sate trong Flutter
- Bài 10: Statefulwidget trong Flutter
- Bài 11: ScopedModel trong Flutter
- Bài 12: Navigator và Routing
- Bài 13: Animation
- Bài 14: Code với native Android
- Bài 15: Code với native IOS
- Bài 16: Giới thiệu về package
- Bài 17: REST API
- Bài 18: Khái niệm về Database
- Bài 19: Chuyển đổi ngôn ngữ
- Bài 20: Testing
- Bài 21: Xuất ứng dụng trong Flutter
- Bài 22: Công cụ phát triển
- Bài 23: Viết ứng dụng hoàn chỉnh