


- Bài 1: Giới thiệu Flutter
- Bài 2: Cài đặt Flutter
- Bài 3: Tạo ứng dụng Flutter đầu tiên
- Bài 4: Kiến trúc ứng dụng Flutter
- Bài 5: Giới thiệu ngôn ngữ Dart
- Bài 6: Widget trong Flutter
- Bài 7: Layout trong Flutter
- Bài 8: Gesture trong Flutter
- Bài 9: Quản lý trạng thái Sate trong Flutter
- Bài 10: Statefulwidget trong Flutter
- Bài 11: ScopedModel trong Flutter
- Bài 12: Navigator và Routing
- Bài 13: Animation
- Bài 14: Code với native Android
- Bài 15: Code với native IOS
- Bài 16: Giới thiệu về package
- Bài 17: REST API
- Bài 18: Khái niệm về Database
- Bài 19: Chuyển đổi ngôn ngữ
- Bài 20: Testing
- Bài 21: Xuất ứng dụng trong Flutter
- Bài 22: Công cụ phát triển
- Bài 23: Viết ứng dụng hoàn chỉnh
Bài 7: Layout trong Flutter - Học lập trình Flutter cơ bản
Đăng bởi: Admin | Lượt xem: 23347 | Chuyên mục: Android
Trong Flutter các layout cũng là một loại widget, nhiệm vụ của chúng là bố trí các widget con, tạo nên giao diện người dùng cho ứng dụng. Flutter cung cấp nhiều loại layout khác nhau như Container, Center, Align... Chúng ta sẽ tìm hiểu chi tiết các loại layout trong bài học này.
Có hai loại widget layout chính trong Flutter
- Single Child Widgets - Chỉ có một widget con
- Multiple Child Widgets - Có nhiều widget con
Single Child Widgets
Các widget layout loại này chỉ có duy nhất một widget con và thường có chức năng bố trí nhất định.
Ví dụ, Center widget chỉ căn giữa widget con so với widget cha của nó và Container widget cung cấp khả năng linh hoạt trong việc đặt widget con bên trong nó thông qua các tuỳ chọn như padding, đường viền, nền,,,,
Single child widgets thích hợp cho việc tạo ra các widget có tính ứng dụng cao và chỉ có một chức năng duy nhất như button, label....
Chúng ta sẽ xem thử đoạn code tạo ra một custom button sử dụng Container widget như sau:
class MyButton extends StatelessWidget {
   MyButton({Key key}) : super(key: key);

   @override
   Widget build(BuildContext context) {
      return Container(
         decoration: const BoxDecoration(
            border: Border(
               top: BorderSide(width: 1.0, color: Color(0xFFFFFFFFFF)),
               left: BorderSide(width: 1.0, color: Color(0xFFFFFFFFFF)),
               right: BorderSide(width: 1.0, color: Color(0xFFFF000000)),
               bottom: BorderSide(width: 1.0, color: Color(0xFFFF000000)),
            ),
         ),
         child: Container(
            padding: const
            EdgeInsets.symmetric(horizontal: 20.0, vertical: 2.0),
            decoration: const BoxDecoration(
               border: Border(
                  top: BorderSide(width: 1.0, color: Color(0xFFFFDFDFDF)),
                  left: BorderSide(width: 1.0, color: Color(0xFFFFDFDFDF)),
                  right: BorderSide(width: 1.0, color: Color(0xFFFF7F7F7F)),
                  bottom: BorderSide(width: 1.0, color: Color(0xFFFF7F7F7F)),
               ),
               color: Colors.grey,
            ),
            child: const Text(
               'OK',textAlign: TextAlign.center, style: TextStyle(color: Colors.black)
            ),
         ),
      );
   }
}
Đoạn code trên sử dụng 2 widget một Container widget
và một Text widget. Kết quả như sau:
Một số single child layout widgets quan trọng trong Flutter
- Padding − Được sử dụng để padding child widget. Ở đây, padding có thể sử dụng EdgeInsets class.
- Align − Căn lề child widget sử dụng thuộc tính alignment. Giá trị của alignment có thể được cung cấp bởi FractionalOffset class. FractionalOffset class xác định vị trí của phần tử từ vị trí điểm trên cùng bên trái
Một số ví dụ về align
- FractionalOffset(1.0, 0.0) biểu thị phiá trên bên phải
- FractionalOffset(0.0, 1.0) biểu thị phía dưới bên trái
Ví dụ qua đoạn code sau:
Center(
   child: Container(
      height: 100.0,
      width: 100.0,
      color: Colors.yellow, child: Align(
         alignment: FractionalOffset(0.2, 0.6),
         child: Container( height: 40.0, width:
            40.0, color: Colors.red,
         ),
      ),
   ),
)
Một số single child layout khác:
- FittedBox
- AspectRatio
- ConstrainedBox
- Baseline
- FractinallySizedBox
- IntrinsicHeight
- IntrinsicWidth
- LiimitedBox
- OffStage
- OverflowBox
- SizedBox
- SizedOverflowBox
- Transform
- CustomSingleChildLayout
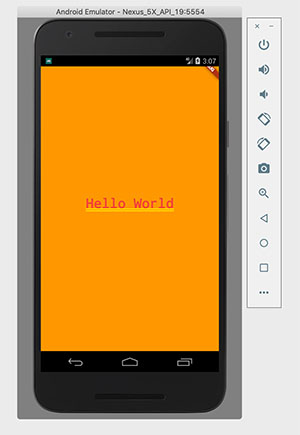
Mình sẽ sửa lại một chút code MyHomePage trong ứng dụng Hello Word ở bài trước để các bạn hiểu rõ hơn
import 'package:flutter/material.dart';

void main() => runApp(MyApp());

class MyApp extends StatelessWidget {
  // This widget is the root of your application.
  @override
  Widget build(BuildContext context) {
    return MaterialApp(
      title: 'Hello World Demo Application',
      theme: ThemeData(
        primarySwatch: Colors.blue,
      ),
      home: MyHomePage(title: 'Home page'),
    );
  }
}
class MyHomePage extends StatelessWidget {
  MyHomePage({Key key, this.title}) : super(key: key);
  final String title;
  @override
  Widget build(BuildContext context) {
    return Container(
        decoration: BoxDecoration(color: Colors.orange,),
        padding: EdgeInsets.all(25), child: Center(
      child:Text(
        'Hello World', style: TextStyle(
        color: Colors.red, letterSpacing: 0.5, fontSize: 30,
      ),
        textDirection: TextDirection.ltr,
      ),
    )
    );
  }
}
Chạy thử trên máy ảo
Multiple Child Widgets
Loại widget layout này sẽ cho phép có nhiều hơn một widget con. Ví dụ Row widget cho phép bố trí các widget con theo chiều ngang thành một hàng trong khi Column widget cho phép bố trí các widget con theo chiều dọc thành một cột.
Một số widget layout dạng này được sử dụng phổ biến
- Row
- Column
- ListView
- GridView
- Expanded
- Table
- Flow
- Stack
Ví dụ
Để hiểu hơn về layout trong Flutter mình sẽ hướng dẫn các bạn thực hiện một giao diện người dùng phức hợp gọi là product listing với thiết kế tuỳ chỉnh sử dụng cả single và multiple child layout widget
Các bạn tạo project Flutter mới đặt tên là product_layout_app.
Thay thế main.dart bằng đoạn code sau đây:
import 'package:flutter/material.dart';
void main() => runApp(MyApp());

class MyApp extends StatelessWidget {
  // This widget is the root of your application.
  @override
  Widget build(BuildContext context) {
    return MaterialApp(
      title: 'Flutter Demo', theme: ThemeData(
      primarySwatch: Colors.blue,),
      home: MyHomePage(title: 'Product layout demo home page'),
    );
  }
}
class MyHomePage extends StatelessWidget {
  MyHomePage({Key key, this.title}) : super(key: key);
  final String title;

  @override
  Widget build(BuildContext context) {
    return Scaffold(
      appBar: AppBar(title: Text(this.title),),
      body: Center(child: Text( 'Hello World', )),
    );
  }
}
Chúng ta tạo một widget là MyHomePage kế thừa từ StatelessWidget
Tiếp theo chúng ta sẽ tạo một widget ProductBox để hiển thị thông tin sản phẩm, bao gồm hình ảnh, tên sản phẩm, mô tả, và giá bán như thiết kế dưới đây:
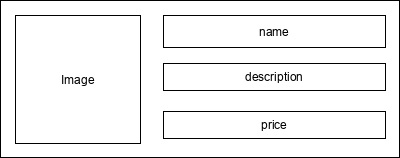
Code của ProductBox như sau:
class ProductBox extends StatelessWidget {
   ProductBox({Key key, this.name, this.description, this.price, this.image})
      : super(key: key);
   final String name;
   final String description;
   final int price;
   final String image;

   Widget build(BuildContext context) {
      return Container(
         padding: EdgeInsets.all(2), height: 120,  child: Card(
            child: Row(
               mainAxisAlignment: MainAxisAlignment.spaceEvenly, children: <Widget>[
                  Image.asset("assets/appimages/" +image), Expanded(
                     child: Container(
                        padding: EdgeInsets.all(5), child: Column(
                           mainAxisAlignment: MainAxisAlignment.spaceEvenly,
                              children: <Widget>[

                              Text(this.name, style: TextStyle(fontWeight:
                                 FontWeight.bold)), Text(this.description),
                              Text("Price: " + this.price.toString()),
                           ],
                        )
                     )
                  )
               ]
            )
         )
      );
   }
}
Giải thích:
ProductBox có 4 thuộc tính như sau:
- name - Tên sản phẩm
- description - Mô tả sản phẩm
- price - Giá của sản phẩm
- image - Hình anhr cửa sản phẩm
ProductBox sử dụng 7 widget như sau:
- Container
- Expanded
- Row
- Column
- Card
- Text
- Image
Để hiểu hơn cấu trúc của ProductBox widget ta xem sơ đồ cấu trúc sau:

Bây giờ, chúng ta thêm ảnh của sản phẩm vào thư mục assets của ứng dụng, tạo thư mục con appimages để chứa ảnh và cấu hình assets trong file pubspec.yaml như sau:
assets:
   - assets/appimages/floppydisk.jpg
   - assets/appimages/iphone.jpg
   - assets/appimages/laptop.jpg
   - assets/appimages/pendrive.jpg
   - assets/appimages/pixel.jpg
   - assets/appimages/tablet.jpg
Các bạn nhấn chuột phải vào ảnh rồi download về máy nhé.
Bây giờ để hiển thị nhiều sản phẩm ta sử dụng ListView widget để chứa các ProductBox, sửa lại code MyHomePage như sau:
class MyHomePage extends StatelessWidget {
  MyHomePage({Key key, this.title}) : super(key: key);
  final String title;

  @override
  Widget build(BuildContext context) {
    return Scaffold(
        appBar: AppBar(title:Text("Product Listing")),
        body: ListView(
          shrinkWrap: true, padding: const EdgeInsets.fromLTRB(2.0, 10.0, 2.0, 10.0),
          children: <Widget> [
            ProductBox(
                name: "iPhone",
                description: "iPhone is the stylist phone ever",
                price: 1000,
                image: "iphone.jpg"
            ),
            ProductBox(
                name: "Pixel",
                description: "Pixel is the most featureful phone ever",
                price: 800,
                image: "pixel.jpg"
            ),
            ProductBox(
                name: "Laptop",
                description: "Laptop is most productive development tool",
                price: 2000,
                image: "laptop.jpg"
            ),
            ProductBox(
                name: "Tablet",
                description: "Tablet is the most useful device ever for meeting",
                price: 1500,
                image: "tablet.jpg"
            ),
            ProductBox(
                name: "Pendrive",
                description: "Pendrive is useful storage medium",
                price: 100,
                image: "pendrive.jpg"
            ),
            ProductBox(
                name: "Floppy Drive",
                description: "Floppy drive is useful rescue storage medium",
                price: 20,
                image: "floppydisk.jpg"
            ),
          ],
        )
    );
  }
}
Full code (main.dart) của ứng dụng (product_layout_app) như sau:
import 'package:flutter/material.dart';
void main() => runApp(MyApp());
class MyApp extends StatelessWidget {
// This widget is the root of your application.
@override
Widget build(BuildContext context) {
return MaterialApp(
title: 'Flutter Demo', theme: ThemeData(
primarySwatch: Colors.blue,),
home: MyHomePage(title: 'Product layout demo home page'),
);
}
}
class MyHomePage extends StatelessWidget {
MyHomePage({Key key, this.title}) : super(key: key);
final String title;
@override
Widget build(BuildContext context) {
return Scaffold(
appBar: AppBar(title:Text("Product Listing")),
body: ListView(
shrinkWrap: true, padding: const EdgeInsets.fromLTRB(2.0, 10.0, 2.0, 10.0),
children: <Widget> [
ProductBox(
name: "iPhone",
description: "iPhone is the stylist phone ever",
price: 1000,
image: "iphone.jpg"
),
ProductBox(
name: "Pixel",
description: "Pixel is the most featureful phone ever",
price: 800,
image: "pixel.jpg"
),
ProductBox(
name: "Laptop",
description: "Laptop is most productive development tool",
price: 2000,
image: "laptop.jpg"
),
ProductBox(
name: "Tablet",
description: "Tablet is the most useful device ever for meeting",
price: 1500,
image: "tablet.jpg"
),
ProductBox(
name: "Pendrive",
description: "Pendrive is useful storage medium",
price: 100,
image: "pendrive.jpg"
),
ProductBox(
name: "Floppy Drive",
description: "Floppy drive is useful rescue storage medium",
price: 20,
image: "floppydisk.jpg"
),
],
)
);
}
}
class ProductBox extends StatelessWidget {
ProductBox({Key key, this.name, this.description, this.price, this.image})
: super(key: key);
final String name;
final String description;
final int price;
final String image;
Widget build(BuildContext context) {
return Container(
padding: EdgeInsets.all(2), height: 120, child: Card(
child: Row(
mainAxisAlignment: MainAxisAlignment.spaceEvenly, children: <Widget>[
Image.asset("assets/appimages/" +image), Expanded(
child: Container(
padding: EdgeInsets.all(5), child: Column(
mainAxisAlignment: MainAxisAlignment.spaceEvenly,
children: <Widget>[
Text(this.name, style: TextStyle(fontWeight:
FontWeight.bold)), Text(this.description),
Text("Price: " + this.price.toString()),
],
)
)
)
]
)
)
);
}
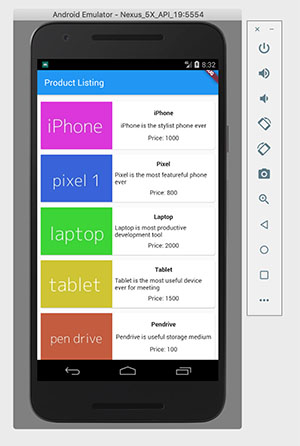
}Chạy thử ứng dụng trên máy ảo:
Theo dõi VnCoder trên Facebook, để cập nhật những bài viết, tin tức và khoá học mới nhất!
- Bài 1: Giới thiệu Flutter
- Bài 2: Cài đặt Flutter
- Bài 3: Tạo ứng dụng Flutter đầu tiên
- Bài 4: Kiến trúc ứng dụng Flutter
- Bài 5: Giới thiệu ngôn ngữ Dart
- Bài 6: Widget trong Flutter
- Bài 7: Layout trong Flutter
- Bài 8: Gesture trong Flutter
- Bài 9: Quản lý trạng thái Sate trong Flutter
- Bài 10: Statefulwidget trong Flutter
- Bài 11: ScopedModel trong Flutter
- Bài 12: Navigator và Routing
- Bài 13: Animation
- Bài 14: Code với native Android
- Bài 15: Code với native IOS
- Bài 16: Giới thiệu về package
- Bài 17: REST API
- Bài 18: Khái niệm về Database
- Bài 19: Chuyển đổi ngôn ngữ
- Bài 20: Testing
- Bài 21: Xuất ứng dụng trong Flutter
- Bài 22: Công cụ phát triển
- Bài 23: Viết ứng dụng hoàn chỉnh