


- Bài 1: Tổng quan về hệ điều hành Android
- Bài 2: Lập trình Android với Android studio
- Bài 3: Các thành phần cơ bản trong một ứng dụng Android
- Bài 4: Activity
- Bài 5: Fragment
- Bài 6: Các thành phần giao diện cơ bản trong Android
- Bài 7: Layout trong Android : Phần 1
- Bài 8: Layout trong Android : Phần 2
- Bài 9: Style và Theme trong Android
- Bài 10: Listview trong Android
- Bài 11: RecyclerView trong Android
- Bài 12: Menu trong Android
- Bài 13: Sử dụng Dialog trong Android
- Bài 14: AndroidManifest.xml Trong Android
- Bài 15: Các tài nguyên và ứng dụng cơ bản trong Android
- Bài 16: Intent trong Android
- Bài 17: Lưu trữ dữ liệu trong Android
- Bài 18: Service trong Android
- Bài 19: Content provider trong Android
- Bài 20: Broadcast Receivers trong Android
- Bài 21: SQLite trong Android
- Bài 22: Android notification
- Bài 23: Animation trong Android
- Bài 24: Android Drawables
- Bài 25: Room trong Android
- Bài 26: CursorLoader trong Android
- Bài 27: Databinding trong Android
- Bài 28: Toolbar, ActionBar trong lập trình Android
- Bài 29: AsyncTask – thread & handler trong Android
- Bài 30: Các thư viện thường dùng trong Android
- Bài 31: Tìm hiểu về MVC, MVP và MVVM
- Bài 32: AlarmManager trong Android
- Bài 33: Permission trong Android
- Bài 34: Đóng gói ứng dụng Android
Bài 8: Layout trong Android : Phần 2 - Lập trình Android cơ bản
Đăng bởi: Admin | Lượt xem: 3947 | Chuyên mục: Android
4. TableLayout trong Android
Trong hệ thống layout của Android thì ta thường sử dụng TableLayout để bố trí các view dưới dạng table, mỗi hàng là một TableRow, và bạn có thể thay đổi các thuộc tính để chỉnh giao diện cho TableRow đó. Vậy TableLayout trong Android là gì thì chúng ta cùng tìm hiểuKhi nói về UI Layout ta không thể không nói đến TableLayout. Ta thường sử dụng TableLayout để bố trí các view dưới dạng table, mỗi hàng là một TableRow, và bạn có thể thay đổi các thuộc tính để chỉnh giao diện cho TableRow đó. Vậy TableLayout trong Android là gì thì chúng ta cùng tìm hiểu.
Giống như Gridlayout , TableLayout là một lớp con của ViewGroup được sử dụng để hiển thị các phần tử View con trong các hàng và cột.
Ví dụ tiêu biểu cho TableLayout :
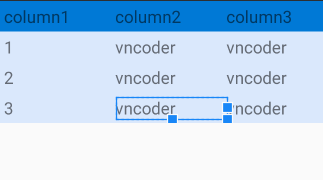
File XML:
<?xml version="1.0" encoding="utf-8"?>
<TableLayout xmlns:android="http://schemas.android.com/apk/res/android"
    android:layout_width="match_parent"
    android:layout_height="match_parent">
    <TableRow android:background="#0079D6" android:padding="5dp">
        <TextView
            android:textSize="20dp"
            android:layout_width="wrap_content"
            android:layout_height="wrap_content"
            android:layout_weight="1"
            android:text="column1" />
        <TextView
            android:textSize="20dp"
            android:layout_width="wrap_content"
            android:layout_height="wrap_content"
            android:layout_weight="1"
            android:text="column2" />
        <TextView
            android:textSize="20dp"
            android:layout_width="wrap_content"
            android:layout_height="wrap_content"
            android:layout_weight="1"
            android:text="column3" />
    </TableRow>
    <TableRow android:background="#DAE8FC" android:padding="5dp">
        <TextView
            android:textSize="20dp"
            android:layout_width="wrap_content"
            android:layout_height="wrap_content"
            android:layout_weight="1"
            android:text="1" />
        <TextView
            android:textSize="20dp"

            android:layout_width="wrap_content"
            android:layout_height="wrap_content"
            android:layout_weight="1"
            android:text="vncoder" />
        <TextView
            android:textSize="20dp"
            android:layout_width="wrap_content"
            android:layout_height="wrap_content"
            android:layout_weight="1"
            android:text="vncoder" />
    </TableRow>
    <TableRow android:background="#DAE8FC" android:padding="5dp">
        <TextView
            android:textSize="20dp"
            android:layout_width="wrap_content"
            android:layout_height="wrap_content"
            android:layout_weight="1"
            android:text="2" />
        <TextView
            android:textSize="20dp"
            android:layout_width="wrap_content"
            android:layout_height="wrap_content"
            android:layout_weight="1"
            android:text="vncoder" />
        <TextView
            android:textSize="20dp"
            android:layout_width="wrap_content"
            android:layout_height="wrap_content"
            android:layout_weight="1"
            android:text="vncoder" />
    </TableRow>
    <TableRow android:background="#DAE8FC" android:padding="5dp">
        <TextView
            android:textSize="20dp"
            android:layout_width="wrap_content"
            android:layout_height="wrap_content"
            android:layout_weight="1"
            android:text="3" />
        <TextView
            android:textSize="20dp"
            android:layout_width="wrap_content"
            android:layout_height="wrap_content"
            android:layout_weight="1"
            android:text="vncoder" />
        <TextView
            android:textSize="20dp"
            android:layout_width="wrap_content"
            android:layout_height="wrap_content"
            android:layout_weight="1"
            android:text="vncoder" />
    </TableRow>
</TableLayout>
4.1 Các thuộc tính của tablelayout
| Thuộc tính | Mô tả |
|---|---|
| android:id | ID là duy nhất để nhận diện Layout |
| android:collapseColumns | Xác định index của các cột (bắt đầu từ 0). Các index cột được phân biệt riêng rẽ bởi dấu phẩy. |
| android:shrinkColumns | Xác định index của các cột (bắt đầu từ 0) để co lại. Các index cột được phân biệt riêng rẽ bởi dấu phẩy. |
| android:stretchColumns | Xác định index của các cột (bắt đầu từ 0) để kéo ra. Các index cột được phân biệt riêng rẽ bởi dấu phẩy. |
5. Framelayout
Framelayout là dạng layout cơ bản nhất khi gắn các view lên layout này thì nó sẽ luôn giữ các view này ở phía góc trái màn hình và không cho chúng ta thay đồi vị trí của chúng, các view đưa vào sau sẽ đè lên view ở trước trừ khi bạn thiết lập transparent cho view sau đó.
Các thuộc tính của Framelayout.
| Thuộc tính | Mô tả |
|---|---|
| android:id | ID là duy nhất để nhận diện Layout |
| android:foreground | Xác định drawable để vẽ lên nội dung và giá trị có thể có thể là một trong các giá trị màu dưới dạng “#rgb”, “#argb”, “#rrggbb” hoặc “#aarrggbb”. |
| android:foregroundGravity | Xác định gravity để áp dụng cho nền trước có thể vẽ được. Gravity mặc định sẽ lấp đầy, giá trị có thể là trên cùng, dưới cùng, bên trái, bên phải, giữa, center_vertical, center_horizontal… |
| android:measureAllChildren | Xác định xem có đo lường tất cả children hay chỉ những children ở trạng thái VISIBLE hoặc INVISIBLE, mặc định là FALSE. |
ví dụ Framelayout :
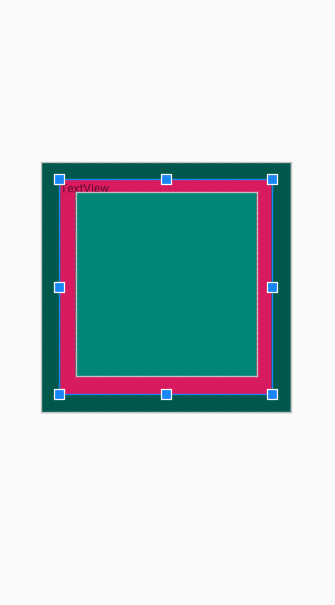
<FrameLayout xmlns:android="http://schemas.android.com/apk/res/android"
    xmlns:tools="http://schemas.android.com/tools"
    android:id="@+id/TableLayout1"
    android:orientation="vertical"
    android:layout_width="match_parent"
    android:layout_height="match_parent"
    android:layout_gravity="center|center_vertical"
    tools:context=".MainActivity" >


    <TextView
        android:layout_marginTop="200dp"
        android:layout_gravity="center_horizontal"
        android:background="@color/colorPrimaryDark"
        android:id="@+id/textView3"
        android:layout_width="300dp"
        android:layout_height="300dp"/>
    <TextView
        android:layout_gravity="center_horizontal"
        android:layout_marginTop="220dp"
        android:id="@+id/textView"
        android:layout_width="254dp"
        android:layout_height="258dp"
        android:background="@color/colorAccent"
        android:text="TextView" />
    <TextView
        android:layout_gravity="center_horizontal"
        android:layout_marginTop="235dp"
        android:id="@+id/textView2"
        android:layout_width="218dp"
        android:layout_height="221dp"
        android:background="@color/colorPrimary" />
</FrameLayout>
Các thuộc tính của FrameLayout trong các View con.
| giá trị | Vị trí của View con |
|---|---|
| bottom | Nằm dưới FrameLayout |
| center | Nằm giữa FrameLayout |
| center_horizontal | Giữa theo chiều ngang |
| center_vertical | Giữa theo chiều đứng |
| end | Cuối FrameLayout |
| left | Bên trái |
| right | Bên phải |
| start | Bắt đầu FrameLayout |
| top | Trên FrameLayout |
6. ConstraintLayout
6.1 Giới thiệu ConstraintLayout
ConstraintLayout là một layout mạnh, khuyến khích bạn dùng nếu có thể vì nó giúp tạo ra các giao diện phức tạp, mềm dẻo (hạn chế tối đa sử dụng các layout lồng nhau). Nó giúp định vị, sắp xếp các View con dựa trên sự ràng buộc liên hệ của các View con với View cha và sự liên hệ ràng buộc giữa các View con với nhau, với cơ chế tạo xích các View, gán trọng số hay sử dụng trợ giúp giao diện với Guideline.
- Constraint layout được giới thiệu lần đầu tiên tại sự kiện Google I/O 2016
- Constraint Layout sẵn dùng với bản Android 2.3 (API level 9)
- Bản mới nhất constraintlayout:2.0.0-beta4
ConstraintLayout thuộc Libaray Support nên để tích hợp vào dự án hãy thêm vào Gradle phiên bản tương ứng :
dependencies { implementation "androidx.constraintlayout:constraintlayout:2.0.0-beta4"}6.2 Ràng buộc trong ConstraintLayout
Mỗi view trong ConstraintLayout để định vị được chính xác cần tối thiếu 2 ràng buộc, một theo phương ngang (X) và một theo phương đứng (Y).
Khái niệm ràng buộc giữa các phần tử ở đây ám chỉ sự liên kết với nhau của các phần tử với nhau (kể cả với phần tử cha ConstraintLayout), sự căn chỉnh phần tử theo phần tử khác, hoặc với những đường thẳng ẩn thêm vào. Mỗi ràng buộc của phần tử View sẽ hoặc hưởng đến vị trí của nó theo trục X hoặc trục Y. Các View không có ràng buộc sẽ định vị ở góc trái - trên (tọa độ 0,0).
Trước tiên tham khảo bảng các thuộc tính về ràng buộc layout_constraint ... , các thuộc tính ràng buộc sử dụng với namespace:app, giá trị nó gán vào là một ID của phần tử khác để kết nối ràng buộc hoặc là phần tử ch bằng hằng số "parent", ví dụ:
app:layout_constraintBottom_toBottomOf="parent"| Ràng buộc | Ý nghĩa ràng buộc |
|---|---|
| layout_constraintLeft_toLeftOf | Rang buộc cạnh trái của phần tử tới phần tử chỉ ra trong giá trị (gán ID) |
| layout_constraintLeft_toRightOf | Bên trái với bên phải của phần tử chỉ ra |
| layout_constraintRight_toLeftOf | Bên phải với bên trái |
| layout_constraintRight_toRightOf | Phải với phải |
| layout_constraintTop_toTopOf | Cạnh trên với cạnh trên |
| layout_constraintTop_toBottomOf | Cạnh trên nối với cạnh dưới |
| layout_constraintBottom_toTopOf | Dưới với trên |
| layout_constraintBottom_toBottomOf | Dưới với dưới |
| layout_constraintBaseline_toBaselineOf | Trùng Baseline |
| layout_constraintStart_toEndOf | Bắt đầu - Kết húc |
| layout_constraintStart_toStartOf | Bắt đầu - Bắt đầu |
| layout_constraintEnd_toStartOf | Cuối với bắt đầu |
| layout_constraintEnd_toEndOf | Cuối với cuối |
<?xml version="1.0" encoding="utf-8"?>
<androidx.constraintlayout.widget.ConstraintLayout xmlns:android="http://schemas.android.com/apk/res/android"
    xmlns:app="http://schemas.android.com/apk/res-auto"
    xmlns:tools="http://schemas.android.com/tools"
    android:layout_width="match_parent"
    android:layout_height="match_parent"
    tools:context=".MainActivity">

    <Button
        android:id="@+id/button1"
        android:layout_width="wrap_content"
        android:layout_height="wrap_content"
        android:text="01"
        app:layout_constraintBottom_toBottomOf="parent"
        app:layout_constraintEnd_toEndOf="parent"
        app:layout_constraintLeft_toLeftOf="parent"
        app:layout_constraintTop_toTopOf="parent"
          />

    <Button
        android:id="@+id/button2"
        android:layout_width="wrap_content"
        android:layout_height="wrap_content"
        android:text="02"
        app:layout_constraintBottom_toBottomOf="parent"
        app:layout_constraintEnd_toEndOf="parent"
         app:layout_constraintStart_toStartOf="parent"
        app:layout_constraintTop_toBottomOf="@+id/button1"
        />

</androidx.constraintlayout.widget.ConstraintLayout>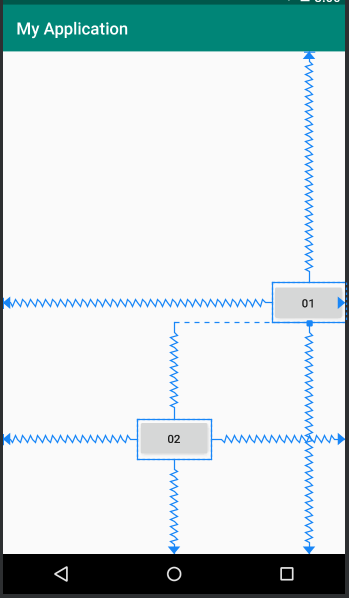
Giá trị match_parent khi xác định width và height của một View sẽ không còn được hỗ trợ với ConstraintLayout nữa.
Thay vào đó, ConstraintLayout giới thiệu một giá trị khác: match_constraint cũng có mục đích tương tự với match_parent
Sử dụng match_constraint bằng cách
- set layout_width hoặc layout_height bằng 0dp
- neo 2 cạnh đối diện của View vào 2 bên tương ứng để width/ height của View tràn ra và đạt được hiệu ứng như match_parent.
6.3 Thuộc tính margin trong các phần tử con
Cạnh nào của View con có ràng buộc thì có thể thiết lập thêm thuộc tính Margin để điều chỉnh thêm khoảng cách các cạnh tới điểm nối ràng buộc.
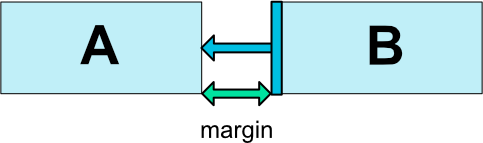
Các thuộc tính margin theo các cạnh: android:layout_marginStart, android:layout_marginEnd, android:layout_marginLeft, android:layout_marginTop, android:layout_marginRight, android:layout_marginBottom
Tương tự có layout_goneMarginStart, layout_goneMarginEnd, layout_goneMarginLeft, layout_goneMarginTop, layout_goneMarginRight, layout_goneMarginBottom có hiệu lực khi đối tượng ràng buộc đến gone.
6.4 Phần tử Guideline
Ta có thể một đường kẻ ẩn trong ConstraintLayout nằm ngang hoặc đứng nó như là một View con để các View khác ràng buộc đến nếu muốn. Thêm vào bằng cách:
<android.support.constraint.Guideline
    android:id="@+id/guideline_1"
    android:layout_width="wrap_content"
    android:layout_height="wrap_content"
    android:orientation="vertical"
    app:layout_constraintGuide_percent="0.3" />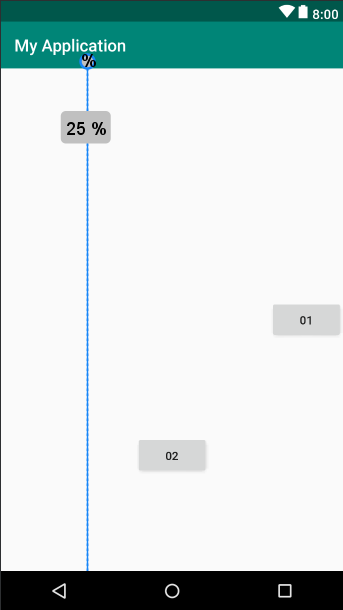
Thiết lập đó là được kẻ ngang bằng thuộc tính: android:orientation="horizontal" đường kể đứng android:orientation="vertical".
6.5 Bias
Khi hai cạnh đối diện nhau của View có ràng buộc, thì hai dàng buộc này ứng xử như một liên kết lò xo mặc định nó có độ mềm (độ cứng) bằng nhau dẫn đến View sẽ nằm giữa 2 điểm neo của ràng buộc. Nếu muốn điều chỉnh độ cứng này thì sử dụng thuộc tính:
- app:layout_constraintVertical_bias thiết lập độ mềm của ràng buộc đầu (ngang). Với tổng độ mềm là 1 thì khi app:layout_constraintVertical_bias="0.1" thì độ mềm ràng buộc thứ hai sẽ là 0.9
- layout_constraintHorizontal_bias để thiết lập độ mềm hai ràng buộc theo phương đứng
Theo dõi VnCoder trên Facebook, để cập nhật những bài viết, tin tức và khoá học mới nhất!
- Bài 1: Tổng quan về hệ điều hành Android
- Bài 2: Lập trình Android với Android studio
- Bài 3: Các thành phần cơ bản trong một ứng dụng Android
- Bài 4: Activity
- Bài 5: Fragment
- Bài 6: Các thành phần giao diện cơ bản trong Android
- Bài 7: Layout trong Android : Phần 1
- Bài 8: Layout trong Android : Phần 2
- Bài 9: Style và Theme trong Android
- Bài 10: Listview trong Android
- Bài 11: RecyclerView trong Android
- Bài 12: Menu trong Android
- Bài 13: Sử dụng Dialog trong Android
- Bài 14: AndroidManifest.xml Trong Android
- Bài 15: Các tài nguyên và ứng dụng cơ bản trong Android
- Bài 16: Intent trong Android
- Bài 17: Lưu trữ dữ liệu trong Android
- Bài 18: Service trong Android
- Bài 19: Content provider trong Android
- Bài 20: Broadcast Receivers trong Android
- Bài 21: SQLite trong Android
- Bài 22: Android notification
- Bài 23: Animation trong Android
- Bài 24: Android Drawables
- Bài 25: Room trong Android
- Bài 26: CursorLoader trong Android
- Bài 27: Databinding trong Android
- Bài 28: Toolbar, ActionBar trong lập trình Android
- Bài 29: AsyncTask – thread & handler trong Android
- Bài 30: Các thư viện thường dùng trong Android
- Bài 31: Tìm hiểu về MVC, MVP và MVVM
- Bài 32: AlarmManager trong Android
- Bài 33: Permission trong Android
- Bài 34: Đóng gói ứng dụng Android