


- Bài 1: ReactJS - Lời mở đầu
- Bài 2: ReactJS - Thiết lập môi trường
- Bài 3: ReactJS - JSX
- Bài 4: ReactJS - Components & State
- Bài 5: Props - Tổng quan
- Bài 6: Props - Validation
- Bài 7: ReactJJS - Component API
- Bài 8: ReactJS - Vòng đời của Component
- Bài 9: ReactJS - Forms
- Bài 10: ReactJS - Xử lý sự kiện
- Bài 11: ReactJS - Refs
- Bài 12: ReactJS - List và Keys
- Bài 13: ReactJS - Router
- Bài 14: ReactJS - Khái niệm Flux
- Bài 15: ReactJS - Cách sử dụng Flux
- Bài 16: ReactJS - Animation
- Bài 17: ReactJS - Higher Order Components
- Bài 18: ReactJS - Bản rút gọn(Quick guide - P1)
- Bài 19: ReactJS - Bản rút gọn(Quick guide - P2)
- Bài 20: ReactJS - Bản rút gọn(Quick guide - P3)
- Bài 21: ReactJS - Tạo ứng dụng reatjs từ bootstrap 4
Bài 19: ReactJS - Bản rút gọn(Quick guide - P2) - Học ReactJS Full Đầy Đủ Nhất
Đăng bởi: Admin | Lượt xem: 2785 | Chuyên mục: Javascript
I. Props
1 . Using Props
Khi chúng ta cần dữ liệu bất biến ( immutable) trong component(thành phần), ta chỉ có thể thêm props vào hàm reactDOM.render () trong main.js và sử dụng nó bên trong component.
App.jsx
import React from 'react';

class App extends React.Component {
   render() {
      return (
         <div>
            <h1>{this.props.headerProp}</h1>
            <h2>{this.props.contentProp}</h2>
         </div>
      );
   }
}
export default App;
main.js
import React from 'react';
import ReactDOM from 'react-dom';
import App from './App.jsx';
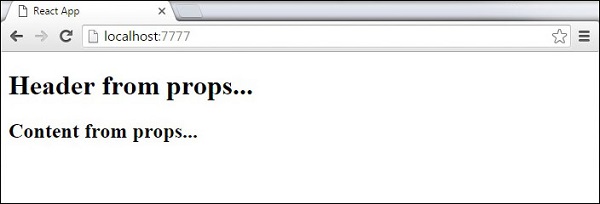
ReactDOM.render(<App headerProp = "Header from props..." contentProp = "Content
from props..."/>, document.getElementById('app'));
export default App;Run npm start và kết quả hiển thị như sau :
Default Props :
Ta có thể đặt giá trị mặc định củaprops trực tiếp trên component ở phương thức khở tạo (constructor) thay vì thêm nó vào reactDom.render ().
App.jsx
import React from 'react';

class App extends React.Component {
   render() {
      return (
         <div>
            <h1>{this.props.headerProp}</h1>
            <h2>{this.props.contentProp}</h2>
         </div>
      );
   }
}
App.defaultProps = {
   headerProp: "Header from props...",
   contentProp:"Content from props..."
}
export default App;
main.js
import React from 'react';
import ReactDOM from 'react-dom';
import App from './App.jsx';

ReactDOM.render(<App/>, document.getElementById('app'));
Kết quả hiện ra như sau :

2 . State và Props:
Ví dụ sau đây cho thấy cách kết hợpstate và props trong ứng dụng của bạn. Mình thiết lập state trong component mẹ và chuyển nó xuống cây component bằng cách sử dụng props. Bên trong hàm kết xuất, mình thiết lập headerProp và contentProp được sử dụng trong các component con.
App.jsx
import React from 'react';

class App extends React.Component {
   constructor(props) {
      super(props);
      this.state = {
         header: "Header from props...",
         content: "Content from props..."
      }
   }
   render() {
      return (
         <div>
            <Header headerProp = {this.state.header}/>
            <Content contentProp = {this.state.content}/>
         </div>
      );
   }
}
class Header extends React.Component {
   render() {
      return (
         <div>
            <h1>{this.props.headerProp}</h1>
         </div>
      );
   }
}
class Content extends React.Component {
   render() {
      return (
         <div>
            <h2>{this.props.contentProp}</h2>
         </div>
      );
   }
}
export default App;
main.js
import React from 'react';
import ReactDOM from 'react-dom';
import App from './App.jsx';

ReactDOM.render(<App/>, document.getElementById('app'));
3. Validating Props :
Mình sẽ tạo 1App component với tất cả các Props mà mình cần. App.propTypes được sử dụng cho props validation(xác thực props). Nếu trường hợp một số props không sử dụng chính xác kiểu(type) mà mình đã chỉ định thì ta sẽ nhận được cảnh báo trên bảng điều khiển. Sau khi đã tạo các mẫu validaion, ta sẽ tiếp tục set App.defaultPropsnhư sau :
App.jsx
import React from 'react';

class App extends React.Component {
   render() {
      return (
         <div>
            <h3>Array: {this.props.propArray}</h3>
            <h3>Bool: {this.props.propBool ? "True..." : "False..."}</h3>
            <h3>Func: {this.props.propFunc(3)}</h3>
            <h3>Number: {this.props.propNumber}</h3>
            <h3>String: {this.props.propString}</h3>
            <h3>Object: {this.props.propObject.objectName1}</h3>
            <h3>Object: {this.props.propObject.objectName2}</h3>
            <h3>Object: {this.props.propObject.objectName3}</h3>
         </div>
      );
   }
}

App.propTypes = {
   propArray: React.PropTypes.array.isRequired,
   propBool: React.PropTypes.bool.isRequired,
   propFunc: React.PropTypes.func,
   propNumber: React.PropTypes.number,
   propString: React.PropTypes.string,
   propObject: React.PropTypes.object
}

App.defaultProps = {
   propArray: [1,2,3,4,5],
   propBool: true,
   propFunc: function(e){return e},
   propNumber: 1,
   propString: "String value...",

   propObject: {
      objectName1:"objectValue1",
      objectName2: "objectValue2",
      objectName3: "objectValue3"
   }
}
export default App;
main.js
import React from 'react';
import ReactDOM from 'react-dom';
import App from './App.jsx';

ReactDOM.render(<App/>, document.getElementById('app'));
Nhấn npm start trong terminal để chạy :kết quả như sau :

Syntax :
class App extends React.Component {
render() {}
}
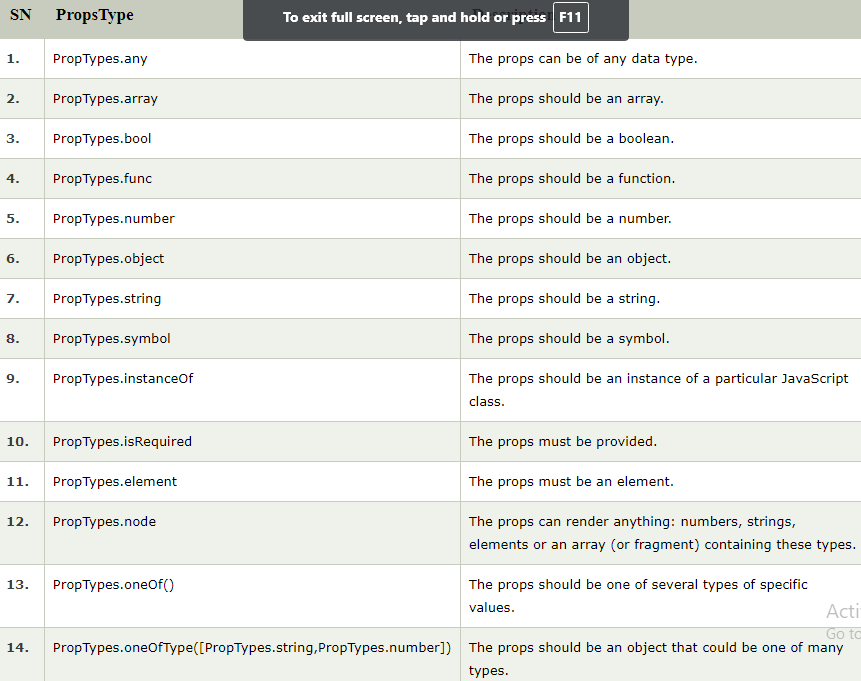
Component.propTypes = { /*Definition */};Một số Props Validator :
4. Ví dụ :
Mình sẽ tạo mộtApp component chứa tất cả các props cần thiết. Trong ví dụ này, App.propTypesđược sử dụng xác thực props. Để làm được, bạn phải thêm dòng này: import PropTypes from 'prop-types' in App.js file.
import React, { Component } from 'react';
import PropTypes from 'prop-types';
class App extends React.Component {
   render() {
      return (
          <div>
              <h1>ReactJS Props validation example</h1>
              <table>
                  <tr>
                      <th>Type</th>
                      <th>Value</th>
                      <th>Valid</th>
                  </tr>
                <tr>
                      <td>Array</td>
                      <td>{this.props.propArray}</td>
                      <td>{this.props.propArray ? "true" : "False"}</td>
                  </tr>
                  <tr>
                      <td>Boolean</td>
                      <td>{this.props.propBool ? "true" : "False"}</td>
                      <td>{this.props.propBool ? "true" : "False"}</td>
                  </tr>
                  <tr>
                      <td>Function</td>
                      <td>{this.props.propFunc(5)}</td>
                      <td>{this.props.propFunc(5) ? "true" : "False"}</td>
                  </tr>
                  <tr>
                      <td>String</td>
                      <td>{this.props.propString}</td>
                      <td>{this.props.propString ? "true" : "False"}</td>
                  </tr>
                  <tr>
                      <td>Number</td>
                      <td>{this.props.propNumber}</td>
                      <td>{this.props.propNumber ? "true" : "False"}</td>
                  </tr>
             </table>
        </div>
        );
   }
}
App.propTypes = {
    propArray: PropTypes.array.isRequired,
    propBool: PropTypes.bool.isRequired,
    propFunc: PropTypes.func,
    propNumber: PropTypes.number,
    propString: PropTypes.string,
}
App.defaultProps = {
    propArray: [1,2,3,4,5],
    propBool: true,
    propFunc: function(x){return x+5},
    propNumber: 1,
    propString: "JavaTpoint",
}
export default App;
Main.js
import React from 'react';
import ReactDOM from 'react-dom';
import App from './App.js';

ReactDOM.render(<App/>, document.getElementById('app'));
npm start ở terminal và ta sẽ được kết quả như sau :

5 . Tùy chỉnh validation :
ReactJS cho phép tạo một hàm tùy chỉnh validation gồm các phần :
- props : Đối số đầu tiên
- propName : Tên propName dùng để xác thực
- componentName : componentName sẽ được xác thực lại
II- Component API
1. Set State :
Phương thức setState() được sử dụng để cập nhật lại trạng thái cho component. Nó không có nghĩa là thay thế trạng thái, chỉ là thay đổi trạng thái ban đầu . Để rõ hơn bạn hãy xem đoạn code dưới đây :
import React from 'react';
class App extends React.Component {
constructor() {
super();
this.state = {
data: []
}
this.setStateHandler = this.setStateHandler.bind(this);
};
setStateHandler() {
var item = "setState..."
var myArray = this.state.data.slice();
myArray.push(item);
this.setState({data: myArray})
};
render() {
return (
<div>
<button onClick = {this.setStateHandler}>SET STATE</button>
<h4>State Array: {this.state.data}</h4>
</div>
);
}
}
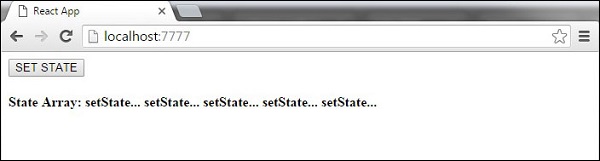
export default App;Ta tạo với mảng mới có tên làdata rỗng. Cứ mỗi lần ta nhấn vào nút Set State thì trạng thái sẽ được cập nhật. Nếu ta click 5 lần thì sẽ được kết quả như sau :
2. Force Update(Bắt buộc cập nhật) :
Đôi lúc ta có thể muốn tự cập nhật trạng thái theo cách thủ công, để làm được điều này ta sẽ sử dụng phương thức forceUpdate()
import React from 'react';
class App extends React.Component {
constructor() {
super();
this.forceUpdateHandler = this.forceUpdateHandler.bind(this);
};
forceUpdateHandler() {
this.forceUpdate();
};
render() {
return (
<div>
<button onClick = {this.forceUpdateHandler}>FORCE UPDATE</button>
<h4>Random number: {Math.random()}</h4>
</div>
);
}
}
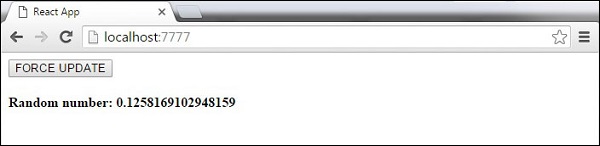
export default App;ở đây mình tạo một con số ngẫu nhiên và nó sẽ cập nhật lại số khác khi mình nhấp vào nút FORCE UPDATE như kết quả dưới đây :
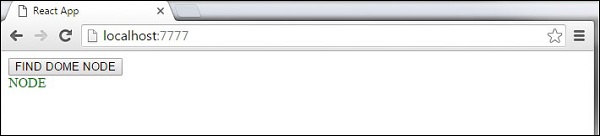
3. Find Dom Node :
Đối với DOM, ta sẽ sử dụng cú pháp ReactDOM.findDOMNode(). Ta cần phải import thư viện react-dom :
import React from 'react';
import ReactDOM from 'react-dom';

class App extends React.Component {
   constructor() {
      super();
      this.findDomNodeHandler = this.findDomNodeHandler.bind(this);
   };
   findDomNodeHandler() {
      var myDiv = document.getElementById('myDiv');
      ReactDOM.findDOMNode(myDiv).style.color = 'green';
   }
   render() {
      return (
         <div>
            <button onClick = {this.findDomNodeHandler}>FIND DOME NODE</button>
            <div id = "myDiv">NODE</div>
         </div>
      );
   }
}
export default App;
Màu của thẻ myDiv sẽ chuyển sang xanh mỗi khi ta nhấn vào nútFIND DOM NODEtrên màn hình, kết quả như sau :
Lưu ý - Kể từ bản cập nhật 0.14, hầu hết các phương thức API thành phần cũ hơn không được dùng nữa hoặc bị loại bỏ để phù hợp với ES6.
III- Vòng đời của Component
Phương thức sử dụng trong vòng đời của component:
- componentWillMount sẽ được thực thi trước trước khi khởi chạy,ở cả 2 phía server(máy chủ) và client(phía người dùng)
- componentDidMount được thực thi sau lần hiển thị đầu tiên ở phía client. Đây là nơi các yêu cầu AJAX và DOM hoặc cập nhật trạng thái. Phương pháp này cũng được sử dụng để tích hợp với các khung JavaScript khác và bất kỳ hàm nào có quá trình thực thi bị trì hoãn như setTimeout hoặc setInterval. mình sử dụng nó để cập nhật trạng thái và có thể kích hoạt các phương thức vòng đời khác.
- componentWillReceiveProps được gọi ngay sau khi các props được cập nhật và trước khi một quá trình khác được gọi. Mình sẽ làm thay đổi giá trị của nó khi cập nhật trạng thái(state).
- shouldComponentUpdate trả về giá trị true hoặc false. Điều này sẽ xác định xem các thành phần có được cập nhật hay không.Và giá trị mặc định là true. Nếu bạn chắc chắn rằng thành phần không cần hiển thị sau khi component và props không cập nhật thì bạn hoàn toàn có thể giá trị mặc định là false.
- componentWillUpdate được gọi trước khi render.
- componentDidUpdate được gọi sau khi render
- componentWillUnmount được gọi sau khi thành phần được ngắt kết nối khỏi dom
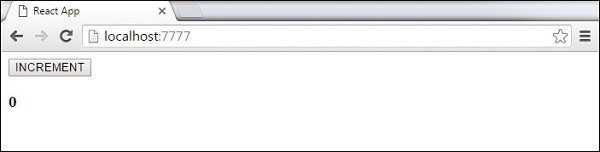
Trong ví dụ dưới đây, mình sẽ đặt hàm khởi tạo state trong constructor. setNewnumber được sử dụng để cập nhật trạng thái cho state. Tất cả phương thức vòng đời nằm trong component contentApp.jsx
import React from 'react';

class App extends React.Component {
   constructor(props) {
      super(props);

      this.state = {
         data: 0
      }
      this.setNewNumber = this.setNewNumber.bind(this)
   };
   setNewNumber() {
      this.setState({data: this.state.data + 1})
   }
   render() {
      return (
         <div>
            <button onClick = {this.setNewNumber}>INCREMENT</button>
            <Content myNumber = {this.state.data}></Content>
         </div>
      );
   }
}
class Content extends React.Component {
   componentWillMount() {
      console.log('Component WILL MOUNT!')
   }
   componentDidMount() {
      console.log('Component DID MOUNT!')
   }
   componentWillReceiveProps(newProps) {
      console.log('Component WILL RECIEVE PROPS!')
   }
   shouldComponentUpdate(newProps, newState) {
      return true;
   }
   componentWillUpdate(nextProps, nextState) {
      console.log('Component WILL UPDATE!');
   }
   componentDidUpdate(prevProps, prevState) {
      console.log('Component DID UPDATE!')
   }
   componentWillUnmount() {
      console.log('Component WILL UNMOUNT!')
   }
   render() {
      return (
         <div>
            <h3>{this.props.myNumber}</h3>
         </div>
      );
   }
}
export default App;
main.js
import React from 'react';
import ReactDOM from 'react-dom';
import App from './App.jsx';

ReactDOM.render(<App/>, document.getElementById('app'));

setTimeout(() => {
   ReactDOM.unmountComponentAtNode(document.getElementById('app'));}, 10000);
Vào terminal và nhập dòng dưới để khởi chạy
npm startSau khi khởi chạy ta sẽ được kết quả như sau :
Bài tập ví dụ :
Trong ứng dụng có khá nhiều component, do đó điều này rất quan trọng trong việc giải phóng các component khi người dùng hủy(destroyed) nó Bây giờ ở ví dụ này, mình muốn xóa bộ nhớ đệm thời gian(clear that timer) bất cứ khi nào đồng hồ (clock) được hiển thị về DOM ở lần đầu. Điều này được gọi là "ngắt kết nối" trong ReactTa cần phải khai báo một vài phương thức đặc biệt trong lớp component để chạy một vài đoạn code khi component kết nối và ngắt kết nối
class Clock extends React.Component {
  constructor(props) {
    super(props);
    this.state = {date: new Date()};
  }

  componentDidMount() {
  }

  componentWillUnmount() {
  }

  render() {
    return (
      <div>
        <h1>Hello, world!</h1>
        <h2>It is {this.state.date.toLocaleTimeString()}.</h2>
      </div>
    );
  }
}
Phương thức trên được gọi là lifecycle methods (vòng đời)Phương thức componentDidMount() sẽ chạy sau khi đầu ra đã được hiển thị ở DOM. Ta sẽ set up a timerở đây :
componentDidMount() {
    this.timerID = setInterval(
      () => this.tick(),
      1000
    );
  }
Lưu ý cách mình đặttimerID ở đoạn code trên
this (this.timerID)có ý nghĩa đặc biệt, bạn có thể tự do thêm các trường bổ sung vào lớp theo cách thủ công nếu bạn cần lưu trữ thứ gì đó không tham gia vào luồng dữ liệu (như timerID).Bây giờ mình sẽ loại bỏ bộ đếm thời gian trong phương thức vòng đời componentWillUnmount ():
componentWillUnmount() {
    clearInterval(this.timerID);
  }
Cuối cùng, chúng ta sẽ thực hiện một phương thức được gọi là tick () màClock componentsẽ chạy mỗi giây.Nó sẽ sử dụng this.setState() để lên lịch và cập nhật trạng thái cho component
class Clock extends React.Component {
  constructor(props) {
    super(props);
    this.state = {date: new Date()};
  }

  componentDidMount() {
    this.timerID = setInterval(
      () => this.tick(),
      1000
    );
  }

  componentWillUnmount() {
    clearInterval(this.timerID);
  }

  tick() {
    this.setState({
      date: new Date()
    });
  }

  render() {
    return (
      <div>
        <h1>Hello, world!</h1>
        <h2>It is {this.state.date.toLocaleTimeString()}.</h2>
      </div>
    );
  }
}

ReactDOM.render(
  <Clock />,
  document.getElementById('root')
);
Và sau khi bạn run code thì kết quả là đồng hồ tích tắc từng giây.Mình sẽ tóm tắt nhanh toàn bộ quá trình của project này như sau :
- Khi thẻ <Clock /> đến hàm ReactDOM.render(), React sẽ gọi hàm khởi tạo của component clock. Vì Clock cần hiển thị thời gian hiện tại, nó sẽ khởi tạo this.state với một đối tượng bao gồm thời gian hiện tại. Do đó ta sẽ cập nhật trạng thái này sau đó
- Sau đó, React gọi phương thức render () của component clock. Đây là cách React tìm hiểu những gì sẽ được hiển thị trên màn hình. Sau đó, React cập nhật DOM để khớp với kết quả hiển thị của clock.
- Khi đầu ra Clock được chèn vào DOM, React sẽ gọi phương thức vòng đời componentDidMount (). Bên trong nó, component clock yêu cầu trình duyệt thiết lập bộ đếm thời gian để gọi phương thức tick () của component mỗi giây một lần.
- Mỗi giây trình duyệt gọi phương thức tick (). Bên trong nó, component clock lên lịch cập nhật giao diện người dùng bằng cách gọi setState () với một đối tượng chứa thời gian hiện tại. Nhờ lời gọi setState (), React biết trạng thái đã thay đổi và gọi lại phương thức render () để tìm hiểu những gì nên hiển thị trên màn hình. Lần này, this.state.date trong phương thức render () sẽ khác và do đó kết quả hiển thị sẽ bao gồm thời gian được cập nhật. React cập nhật DOM một cách phù hợp.
- Nếu component clock đã từng bị xóa khỏi DOM, React sẽ gọi phương thức componentWillUnmount () để bộ đếm thời gian dừng lại
IV- Forms
1. Thao tác với Form trong ReactJS :
Dưới đây là các thao tác mà bạn có thể làm việc với form trong ReactJS, hầu như đây là những thao tác quen thuộc
a . Lấy giá trị của input :
Chúng ta có thể lấy giá trị của input bằng cách bắt sự kiện onChange của input.Trước tiên, chúng ta sẽ tạo state dùng để chứa giá trị của input trong hàm constructor().
constructor(props) {
    super(props);
    this.state = {
      email : ''
    }
}
Tiếp theo, chúng ta sẽ bắt sự kiện onChange trong input :
<input type="email" onChange={(event) => this.changeInputValue(event)}/>Khi sự kiện onChange được kích hoạt, chúng ta sẽ có một biến là event, trong đó sẽ chứa các thông tin của input như name, value,...Ở đây mình truyền biến event vào trong function changeInputValue().Sau đó, chúng ta sẽ xây dựng hàm changeInputValue() dùng để thay đổi state (cái mà sẽ lưu giá trị của input) mà mình đã khởi tạo trước đó.
changeInputValue(event){
     // Cập nhật state
    this.setState({
      [event.target.name]: event.target.value
    })
}
Lúc này, bạn đã thực hiện xong các bước để lấy giá trị của input trong form. Tất cả các giá trị đó được lưu trong state.
Submit Form :
Sau khi lấy giá trị của input, form cần đượcsubmit, bạn có thể thực hiện submit form bằng cách bắt sự kiện onSubmit trong form.
<form onSubmit={(event) => {
        this.submitForm(event)
}}>
khi sự kiệnonSubmit được thực thi thì biến event chứa thông tin của form sẽ tồn tại, chúng ta sẽ truyền nó vào trong hàm submitForm()để xử lý.
submitForm(event) {
   //Chặn sự kiện mặc định của form
   event.preventDefault()
   //In ra giá trị của input trong form
   console.log(this.state)
 }
Validation Form :
Bạn có thể thực hiện validation form trong ReactJS bằng cách xây dựng một hàm validation, giả sử mình có một hàm kiểm tra email:
validationForm() {
   const re = /\S+@\S+\.\S+/;
   //Kiểm tra email
   if (re.test(this.state.email)) return false;
   return true;
 }
và thêm nó vào hàm submitForm() đã khởi tạo trước đó :
submitForm(event) {
   //Chặn sự kiện mặc định của form
   event.preventDefault()
   //Validaton form
  if(!this.validationForm()) {
     alert('Email không đúng định dạng.')
   }
 }
2. Xây dựng ví dụ form trong React JS
Trong phần này mình sẽ đi xây dựng ví dụ về xử lý form trong ReactJS, ở đây mình sẽ đi xây dựng một trang đăng nhập đơn giản bao gồm chức năng validation.Ở phần khởi tạo giao diện mình sử dụng Bootstrap 4 để xây dựng giao diện, bởi vậy bạn cần thêm thư viện này vào trong file public/index.html:
<link rel="stylesheet" href="https://maxcdn.bootstrapcdn.com/bootstrap/4.4.1/css/bootstrap.min.css">Từ bây giờ chúng ta sẽ làm việc với các file trong thư mục srcTrước tiên, chúng ta sẽ đi xây dựng giao diện cho form, trong file App.js chúng ta sẽ đi xây dựng giao diện và khơi tạo state chứa giá trị của input.
import React from "react";

class App extends React.Component {
  constructor(props) {
    super(props);
    //Khởi tạo state chứa giá trị của input
    this.state = {
      email: "",
      password: ""
    };
  }
  render() {
    return (
      <div className="container" style={{ paddingTop: "5%" }}>
        <form
          onSubmit={e => {
            this.submitForm(e);
          }}
        >
          <div className="form-group">
            <label htmlFor="text">Email:</label>
            <input
              type="text"
              className="form-control"
              name="email"
              placeholder="Enter email"
              onChange={e => this.changeInputValue(e)}
            />
          </div>
          <div className="form-group">
            <label htmlFor="pwd">Password:</label>
            <input
              type="password"
              className="form-control"
              name="password"
              placeholder="Enter password"
              onChange={e => this.changeInputValue(e)}
            />
          </div>
          <button type="submit" className="btn btn-primary">
            Submit
          </button>
        </form>

      </div>
    );
  }
}
export default App;
Tiếp theo, xây dựng hàmchangeInputValue()có nhiệm vụ lấy giá của input sau đó cập nhật vào state.
changeInputValue(e) {
    this.setState({
      [e.target.name]: e.target.value
    });
}
Xây dựng hàmvalidationForm()để kiểm tra các giá trị khi submit form
validationForm() {
    let returnData = {
      error : false,
      msg: ''
    }
    const {email, password} = this.state
    //Kiểm tra email
    const re = /\S+@\S+\.\S+/;
    if (!re.test(email)) {
      returnData = {
        error: true,
        msg: 'Không đúng định dạng email'
      }
    }
    //Kiểm tra password
    if(password.length < 8) {
      returnData = {
        error: true,
        msg: 'Mật khẩu phải lớn hơn 8 ký tự'
      }
    }
    return returnData;
  }
Cuối cùng, xây dựng hàmsubmitForm()cho sự kiện submit form:
submitForm(e) {
    //Chặn các event mặc định của form
    e.preventDefault();

   //Gọi hàm validationForm() dùng để kiểm tra form
    const validation = this.validationForm()

    //Kiểm tra lỗi của input trong form và hiển thị
    if (validation.error) {
      alert(validation.msg)
    }else{
      alert('Submit form success')
    }
  }
Khởi chạy dự án bằng cách mở terminal lên và gõ dòng lệnh:
npm startVí dụ cơ bản :
Trong ví dụ trước, ta đã đặt tham số đầu vào của form với value = {this.state.data} . Điều này cho phép ta cập nhật trạng thái bất cứ khi nào giá trị input thay đổi.Mình sẽ sử dụng sự kiện onChange để xem sự thay đổi của input và cập nhật trạng thái phù hợpApp.jsx
import React from 'react';

class App extends React.Component {
   constructor(props) {
      super(props);

      this.state = {
         data: 'Initial data...'
      }
      this.updateState = this.updateState.bind(this);
   };
   updateState(e) {
      this.setState({data: e.target.value});
   }
   render() {
      return (
         <div>
            <input type = "text" value = {this.state.data}
               onChange = {this.updateState} />
            <h4>{this.state.data}</h4>
         </div>
      );
   }
}
export default App;
main.js
import React from 'react';
import ReactDOM from 'react-dom';
import App from './App.jsx';

ReactDOM.render(<App/>, document.getElementById('app'));
Ví dụ nâng cao :
Ở ví dụ sau, ta sẽ thấy cách sử dụng các form từ component con. Phương thức onChange sẽ kích hoạt cập nhật trạng thái và được chuyển đến giá trị đầu, sau đó hiển thị trên màn hình. Một ví dụ tương tự được sử dụng trong bài Sự kiện. Bất cứ khi nào ta cần cập nhật trạng thái từ component con, ta cần chuyển hàm sẽ xử lý việc cập nhật (updateState) như một props (updateStateProp). App.jsx
import React from 'react';

class App extends React.Component {
   constructor(props) {
      super(props);

      this.state = {
         data: 'Initial data...'
      }
      this.updateState = this.updateState.bind(this);
   };
   updateState(e) {
      this.setState({data: e.target.value});
   }
   render() {
      return (
         <div>
            <Content myDataProp = {this.state.data}
               updateStateProp = {this.updateState}></Content>
         </div>
      );
   }
}
class Content extends React.Component {
   render() {
      return (
         <div>
            <input type = "text" value = {this.props.myDataProp}
               onChange = {this.props.updateStateProp} />
            <h3>{this.props.myDataProp}</h3>
         </div>
      );
   }
}
export default App;
main.js
import React from 'react';
import ReactDOM from 'react-dom';
import App from './App.jsx';

ReactDOM.render(<App/>, document.getElementById('app'));
Kết quả như hình bên dưới
V- Xử lý sự kiện
1. Cài đặt môi trường :
Khởi tạo project thông qua lệnh
npm install -g create-react-app

create-react-app myProject
2. Gọi và xử lý sự kiện (Handling Event) trong Reactjs :
a. Sự kiện không truyền tham số :
//App.js
import React, { Component } from 'react';
import './App.css';
import Product from './components/Product';

class App extends Component {
    onClickMe() {
        alert('hello world cup');
    }
    render() {
        return (
            <div>
                 <button type="button" className="btn btn-default" onClick={ this.onClickMe }>
                        Click Me !
                 </button>
            </div>
        );
    }
}

export default App;
Sau đó bạn mởcmd (hoặc terminal) lên vào thư mục đang chứa project chạy lện npm start và Click thử vào button "Click Me !" thì bạn sẽ nhận được một cái popup với nội dung là "hello world cup".Vấn đề đặt ra là cái "onClick" kia lấy ở đâu ra thì bạn có thể truy cập vào trang này thì tại đây reacjs có hỗ trợ chúng ta rất là nhiều event như: onChange, onSubmit...
b. Sự kiện truyền có thêm tham số :
Cách 1: Sử dụng hàm bind để truyền tham số :Ví dụ 1: bind tham số trực tiếp ở hàm:
//App.js
import React, { Component } from 'react';
import './App.css';
import Product from './components/Product';
class App extends Component {
onClick(text) {
alert(text);
}
render() {
return (
<div>
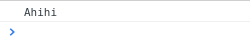
<button type="button" className="btn btn-default" onClick={ this.onClickMe.bind(this, 'Ahihi') }>
Click Me !
</button>
</div>
);
}
}
export default App;Ví dụ 2: bind tham số ở trên hàm constructor:
//App.js
import React, { Component } from 'react';
import './App.css';
import Product from './components/Product';

class App extends Component {

    constructor(props) {
        super(props);
        this.onClickMe = this.onClickMe.bind(this, 'Ahihi')
    }

    onClick(text) {
        alert(text);
    }
    render() {
        return (
            <div>
                 <button type="button" className="btn btn-default" onClick={ this.onClickMe }>
                    Click Me !
                 </button>
            </div>
        );
    }
}
Khi chạy lên cả hai ví dụ trên và click vào button thì đều có cùng kết quả là "Ahihi".
Cách 2: Sử dụng arrow function trong Es6
//App.js
import React, { Component } from 'react';
import './App.css';
import Product from './components/Product';

class App extends Component {
    onClick(text) {
        alert(text);
    }
    render() {
        return (
            <div>
                 <button type="button" className="btn btn-default" onClick={ () =>  this.onClickMe('Ahihi') }>
                    Click Me !
                 </button>
            </div>
        );
    }
}
Chạy chương trình lên và click vào button thì kết quả cũng giống hai ví dụ trên dều nhận được là "Ahihi"
3. Các ví dụ :
Ví dụ đơn giảnỨng dụng dùng để refresh chính xác thời gianTa tạo tạo file jsx như ở
dưới onClick-example.
jsx
class CurrentTime extends React.Component {
  constructor(props) {
    super(props);

    var now = new Date();
    this.state = {
      currentTime: now.toString()
    };
  }

  // A method of CurrentTime component
  refreshCurrentTime() {
    var now = new Date();
    this.setState({ currentTime: now.toString() });
  }
  render() {
    return (
      <div>
        <h4>Current Time:</h4>
        <p>{this.state.currentTime}</p>
        <button onClick={() => this.refreshCurrentTime()}>
          Refresh Current Time
        </button>
      </div>
    );
  }
}

// Render
ReactDOM.render(<CurrentTime />, document.getElementById("currenttime1"));
onClick-example.html
<!DOCTYPE html>
<html lang="en">
   <head>
      <meta charset="UTF-8">
      <title>ReactJS Event</title>
      <script src="https://unpkg.com/react@16.4.2/umd/react.production.min.js"></script>
      <script src="https://unpkg.com/react-dom@16.4.2/umd/react-dom.production.min.js"></script>
      <script src="https://unpkg.com/babel-standalone@6.26.0/babel.min.js"></script>
      <style>
         #currenttime1 {
         border:1px solid blue;
         padding: 5px;
         margin-top: 20px;
         }
      </style>
   </head>
   <body>
      <h3>ReactJS Event: onClick</h3>

      <div id="currenttime1"></div>

      <script src="onClick-example.jsx" type="text/babel"></script>

   </body>
</html>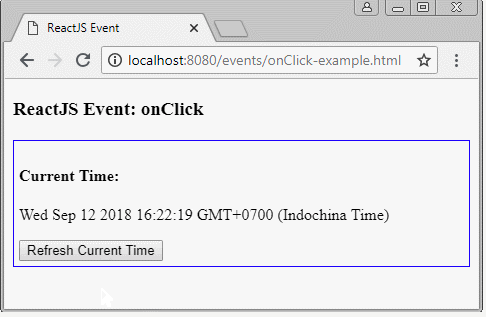
Ở ví dụ tiếp theo ta có sử dụng arrow functionnhư ở trên các bạn xem đoạn code sau để hiểu rõ hơn :
// Normal function with parameters
var myfunc = function(param1, param2)  {
   // Statements
};

// Arrow function with parameters.
var arrfunc = (param1, param2) => {
   // Statements
};


// Normal function without paramters.
var myfunc2 = function( )  {
   // Statements
};

// Arrow function without parameters.
var arrfunc2 = ( ) => {
   // Statements
};

// If function have only one statement.
var arrfunc2 = ( ) => singleStatement;
onClick, onChange,..
onClick phải gọi đến một hàm Javascript, nó không thể gọi trực tiếp đến một phương thức của Component. Vì vậy onClick nên gọi đến một hàm nặc danh (anonymous), và bên trong hàm nặc danh này bạn có thể gọi đến phương thức của Component:
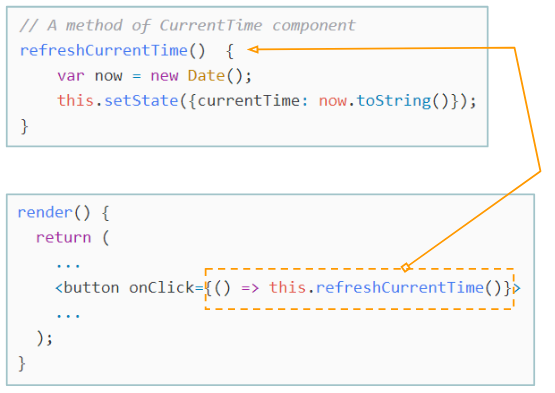
Arrow function với tham số event:
// A method of Component with event parameter.
refreshCurrentTime(event) {
  var now = new Date();
  this.setState({ currentTime: now.toString() });
}

render() {
  return (
    <div>
      <h4>Current Time:</h4>
      <p>{this.state.currentTime}</p>
      <button onClick={(event) => this.refreshCurrentTime(event)}>
          Refresh Current Time
      </button>
    </div>
  );
}
Với Javascript ES6 bạn cũng có thể gọi đến phương thức của Component theo cách sau:example.jsx
// A method of this Component.
refreshCurrentTime(event) {
  var now = new Date();
  this.setState({ currentTime: now.toString() });
}

render() {
  return (
    <div>
      <h4>Current Time:</h4>
      <p>{this.state.currentTime}</p>
      <button onClick={this.refreshCurrentTime.bind(this,event)}>
         Refresh Current Time
      </button>
    </div>
  );
}
Event của Component con
Một sự kiện xẩy ra tại Component con, nhưng bạn muốn gọi đến một phương thức tại Componen cha, dưới đây là một ví dụ như thế.
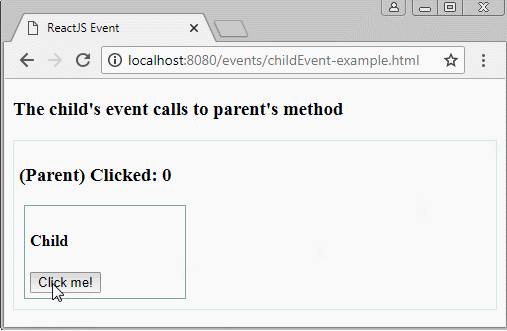
childEvent-example.jsx
// <Child> with 1 attribute: myClickHandler
// <Child myClickHandler=.. />
class Child extends React.Component {
  render() {
    return (
      <div className="child">
        <h4>Child</h4>
        <button onClick={this.props.myClickHandler}>Click me!</button>
      </div>
    );
  }
}

class Parent extends React.Component {
  constructor(props) {
    super(props);

    this.state = {
      count: 0
    };
  }

  myMethodOfParent() {
    this.setState((prevState, props) => {
      return {
        count: prevState.count + 1
      };
    });
  }

  render() {
    return (
      <div className="parent">
        <h3>(Parent) Clicked: {this.state.count} </h3>
        <Child myClickHandler={() => this.myMethodOfParent()} />
      </div>
    );
  }
}

// Render
ReactDOM.render(<Parent />, document.getElementById("placeholder1"));
childEvent-example.html
<!DOCTYPE html>
<html lang="en">
<head>
<meta charset="UTF-8">
<title>ReactJS Event</title>
<script src="https://unpkg.com/react@16.4.2/umd/react.production.min.js"></script>
<script src="https://unpkg.com/react-dom@16.4.2/umd/react-dom.production.min.js"></script>
<script src="https://unpkg.com/babel-standalone@6.26.0/babel.min.js"></script>
<style>
.parent {
border:1px solid #d9ebe8;
padding: 5px;
margin-top: 20px;
}
.child {
width:150px;
border:1px solid #8cb0aa;
margin: 5px;
padding: 5px;
}
</style>
</head>
<body>
<h3>The child's event calls to parent's method</h3>
<div id="placeholder1"></div>
<script src="childEvent-example.jsx" type="text/babel"></script>
</body>
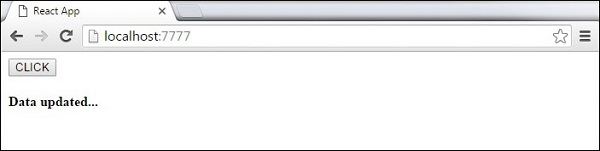
</html>Ta tiếp tục với ví dụ đơn giản sau để hiểu hơn cách sử dụng 1 component. Ta sẽ thêm sự kiện onClick ở bên trong hàm updateState mỗi khi ta nhấn vào button
App.jsx
import React from 'react';

class App extends React.Component {
   constructor(props) {
      super(props);

      this.state = {
         data: 'Initial data...'
      }
      this.updateState = this.updateState.bind(this);
   };
   updateState() {
      this.setState({data: 'Data updated...'})
   }
   render() {
      return (
         <div>
            <button onClick = {this.updateState}>CLICK</button>
            <h4>{this.state.data}</h4>
         </div>
      );
   }
}
export default App;
main.js
import React from 'react';
import ReactDOM from 'react-dom';
import App from './App.jsx';

ReactDOM.render(<App/>, document.getElementById('app'));
Kết quả như sau :
Sự kiện con
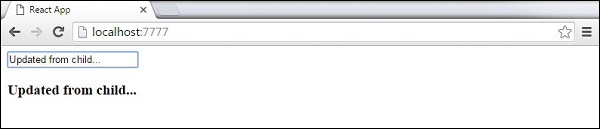
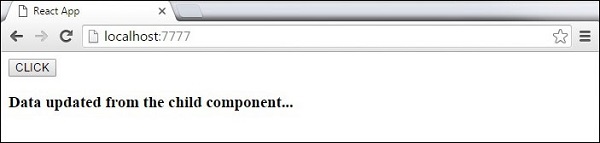
Khi chúng ta cần cập nhật trạng thái của component cha từ component con, ta có thể tạo ra sự kiên handler (updateState) trong component cha và gọi ra bằng prop(updateStateProp) để gọi tham số đến component con
App.jsx
import React from 'react';

class App extends React.Component {
   constructor(props) {
      super(props);

      this.state = {
         data: 'Initial data...'
      }
      this.updateState = this.updateState.bind(this);
   };
   updateState() {
      this.setState({data: 'Data updated from the child component...'})
   }
   render() {
      return (
         <div>
            <Content myDataProp = {this.state.data}
               updateStateProp = {this.updateState}></Content>
         </div>
      );
   }
}
class Content extends React.Component {
   render() {
      return (
         <div>
            <button onClick = {this.props.updateStateProp}>CLICK</button>
            <h3>{this.props.myDataProp}</h3>
         </div>
      );
   }
}
export default App;
main.js
import React from 'react';
import ReactDOM from 'react-dom';
import App from './App.jsx';

ReactDOM.render(<App/>, document.getElementById('app'));
Kết quả như sau :
VI- Refs
1. Giới thiệu về Refs
Trong data flow của React, props là cách để các parent components tương tác với các child components. Để updated child componnent, bạn cần re-render nó với các props mới. Nhưng sẽ có một số trường hợp cần bắt buộc phải updated các child component bên ngoài data flow của React. Các child component có thể là 1 instance của React Component hoặc có thể là DOM element. Cho những trường hợp này, chúng ta có thể sử dụng react Refs.Đối với các bạn mới tiếp xúc với React , chắc hẳn có những khái niệm, cú pháp khá khó hiểu và phức tạp, ko dễ để tiếp cận, trong đó có "refs" . Qua bài này mình xin giới thiệu lại và tìm hiểu sâu về refs trong react. Theo tài liệu của React, refs được sử dụng để lấy tham chiếu đến một node DOM(Document Object Model) hoặc có thể là một thể hiện của một component trong một ứng dụng React. tức là refs sẽ return về một node mà chúng ta tham chiếu đến. Nào cùng xem một vài ví dụApp.jsx
export default class index extends React.Component {
  constructor() {
    super();
    this.state = {sayings: "" };
  }
  update(e) {
    this.setState({sayings: e.target.value});
  }

  render() {
    return (
      <div>
        Bob says <input type="text" onChange={this.update.bind(this)} />
        {this.state.sayings}
      </div>
    );
  }
}
Trong ví dụ trên, việc nhận được giá trị Bob nói chúng ta dùng giá trị target của sự kiện thay đổi trong thẻ input. Sử dụng refs có thể thực hiện theo cách sau.
export default class index extends React.Component {
  constructor() {
    super();
    this.state = {sayings: "" };
  }
  update(e) {
    this.setState({sayings: this.refs.btalks.value});
  }

  render() {
    return (
      <div>
        Bob says <input type="text" ref="btalks" onChange={this.update.bind(this)} />
        {this.state.sayings}
      </div>
    );
  }
}
Ngoài ra chúng ta có thể bỏ qua một callback trong refs bằng cách đặt tên cho node đó .
update(e) {
    this.setState({sayings: this.a.value});
  }

  render() {
    return (
      <div>
        Bob says <input type="text" ref={(node) => {this.a = node}} onChange={this.update.bind(this)} />
Khi bạn cần refs thay vì ID's Như đã biết thì ID's hoạt động như một phần tử độc lập trong toàn bộ cây DOM , có ví dụ sau
export default class index extends React.Component {
constructor() {
  super();
  this.state = {sayings: "" };
}
onFocus() {
  document.getElementById('myInput').style.backgroundColor='red';
}

render() {
  return (
    <div>
      Bob angry <input type="button" id="myInput" onFocus={this.onFocus.bind(this)} />
      <br/>
      Tim angry <input type="button" id="myInput" onFocus={this.onFocus.bind(this)} />
    </div>
  );
}
}
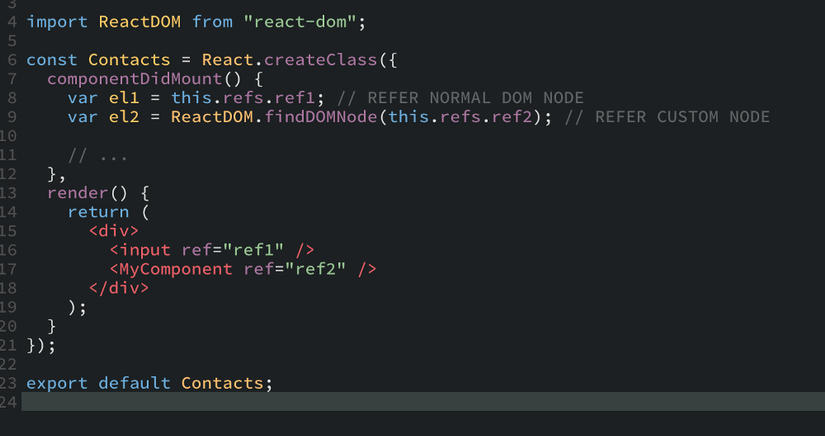
Ô của bob sẽ luôn được tô đỏ so với của Tim vì cả 2 đều cùng Id. Nếu chúng ta sử dụng refs chúng ta có thể thay thế IDs với một tên refs cụ thể là được. Khi cần trả về một node DOM hoặc một component Nếu các ref points đến môt component tiêu chuẩn (node DOM, input, select, div..) sau đó để lấy các phần tử, chỉ cần gọi this.refs.ref. Nếu các ref points đến một tổ hợp các component bạn cần sử dụng ReactDOM module : ReactDOM.findDOMNode(this.refs.ref.)
Khi nào thì giá trị đầu tiền của ref được set? Trong các render(), lifecycle methods tồn tại gồm có: ComponentWillMount(), ComponentDidMount(), ComponentWillUnmount(),.. refđầu tiên sẽ được set đầu tiên ở render nhưng trước ComponentDidMount(), Khi nào nên sử dụng refs
2. Một số trường hợp dùng refs
- Control focus; get text của DOM element; get state value(play/pause/timeline) của media playback,... nói chung là dùng trong những trường hợp các data này không cần đưa vào state của component.
- Trigger các transitions, animations: sử dụng refs khi một element cần trigger animation/transition của một element khác
- Tích hợp với các Third-party DOM libraries
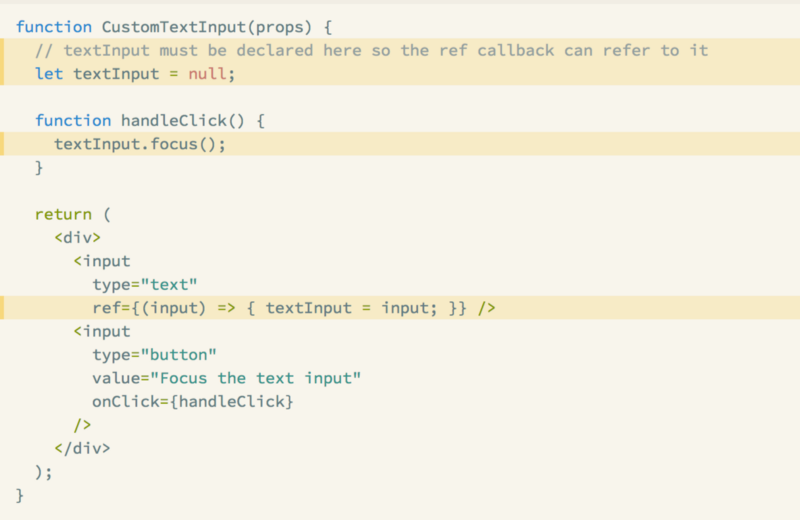
Chú ý khi sử dụng refsa - Don’t Inline refs callbacks(không gọi phươg thức refs trong cùng 1 dòng code):
Bob says <input type="text" ref={(node) => {this.a = node}} onChange={this.update.bind(this)} />
=> và function bind trong 1 render() sẽ sản sinh ra một performance bởi mỗi lần
=> và function bind trong 1 render() sẽ sản sinh ra một performance bởi mỗi lần hàm đó render mới lại. Vậy nên hãy dùng
Bob says <input type="text" ref={this.setRef} onChange={this.update.bind(this)} />Ngoài ra nếu ref call back sẽ được định nghĩa như function nội tuyến, nó sẽ bị gọi lại 2 lần trong quá trình cập nhật, lần đầu sẽ trả về null và tiếp theo mới trả về phần tử DOM. React sẽ thực hiện viện dọn dẹp các ref cũ và set up ref mới chỉ trong trường hợp những bước phía trước vào callback tiếp theo thực hiện những chức năng khác nhau.b - Đặt tên refs là chuỗi cũng là không nên
Bob says <input type="text" ref="btalks" onChange={this.update.bind(this)} />c - ref không nên dùng trên các component không có chức năng là thẻ DOM , ví dụ ref dùng trên component trả về 1 input:
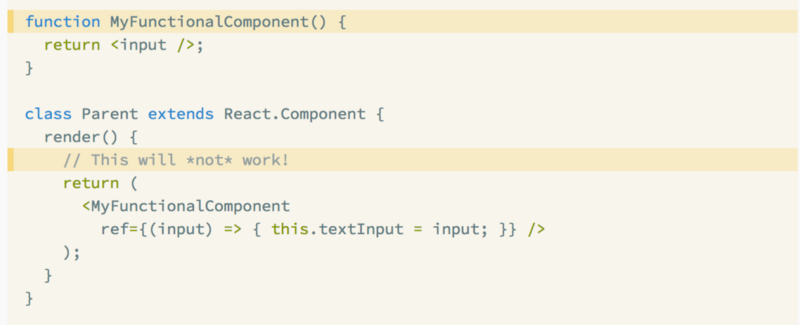
Nhưng thuộc tính ref sẽ làm việc trong component miễn là bạn đề cập đến một phần tử DOM hoặc một class component:
3. Sử dụng useRef của react hooks
Cú pháp :
const refContainer = useRef(initialValue);Đoạn code ở trên, chúng ta sẽ khởi tạo 1ref object có .current property với initialValue.useRef sẽ cho cùng 1 refobject trên mỗi lần render.
- Nếu ref object này là 1 DOM element thì chúng ta có thể manipulated các DOM element này như pure javascript thường làm.
- Nếu ref object này là 1 javascript object thì các object này sẽ tồn tại trong scope của component như 1 plain javascript object thông thường.
4. Các ví dụ:
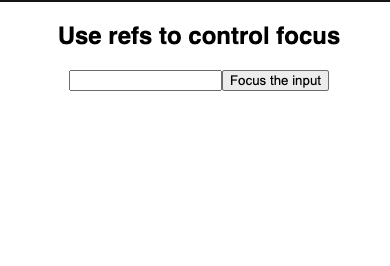
Ví dụ 1 : Điều khiển focus của input:
Ở ví dụ này, chúng ta sẽ sử dụnguserRef để tham chiếu tới input element, sau đó sẽ thực hiện focus inputkhi click button
import React, { useRef } from "react";

function App() {
  const inputEl = useRef(null);

  const onButtonClick = () => {
    inputEl.current.focus();
  };

  return (
    <div className="App">
      <h2>Use refs to control focus</h2>
      <input ref={inputEl} />
      <button onClick={onButtonClick}>Focus the input</button>
    </div>
  );
}
Set/Get giá trị trước đó của state:
Ở ví dụ này; sẽ có 1 input, nhập một vài ký tự và thực hiện blur input đó, chúng ta sẽ check xem previous value, current value sau mỗi lần blur input (case này trong thực tế là: nếu sau mỗi lần blur mà giá trị trước và sau khi blur có thay đổi thì thực hiện call api, ngược lại nếu không thay đổi thì không làm gì cả)
import React, { useRef, useState } from "react";

function App() {
  const prevValue = useRef("");
  const [value, setValue] = useState("");

  const onInputChange = e => {
    setValue(e.target.value);
  };

  const onInputBlur = () => {
    console.log(`Previous value: ${prevValue.current}`);
    console.log(`Current value: ${value}`);
    prevValue.current = value;
  };

  return (
    <div className="App">
      <h2>Use refs to set/get previous state's value</h2>
      <input value={value} onBlur={onInputBlur} onChange={onInputChange} />
      <div>Type something, blur input and check result in console.log</div>
    </div>
  );
}
demo : https://codesandbox.io/s/hungry-glade-d7mjbSau khi hiểu về useRef ở ví dụ trên, chúng ta sẽ hay gặp 1 trường hợp thực tế như sau: sau khi input data vào các field trên màn hình(route A) sau đó điều hướng sang route B, lúc này ta sẽ cần lưu các data trên màn hình vào redux store như sau:
import React, { useState, useEffect, useRef } from "react";

function App() {
  const onScreenData = useRef({});
  const [inputs, setInputs] = useState({});

  const onInputChange = e => {
    const [name, value] = e.target;
    const updatedInputs = { ...inputs, [name]: value };
    setInputs(updatedInputs);
    onScreenData.current = updatedInputs;
  };

  useEffect(
    () => () => {
      saveScreenData(onScreenData.current);
    },
    []
  );

  return (
    <div>
      <h2>Use refs to get the latest inputs value</h2>
      <label>Title: </label>
      <input name="title" value={inputs.title || ""} onChange={onInputChange} />
      <label>Note: </label>
      <input name="note" value={inputs.note || ""} onChange={onInputChange} />
    </div>
  );
}

const saveScreenData = data => {
  // Save data to redux store
};
Control animation:
Chúng ta sử dụnguseRef để get tham chiếu đến DOM element và thực hiện trigger animation
import React, { useRef, useEffect } from "react";
import { TweenMax } from "gsap";

function App() {
  const circle = useRef(null);

  useEffect(() => {
    TweenMax.fromTo(
      [circle.current],
      0.5,
      { y: 18 },
      { y: -18, yoyo: true, repeat: -1 }
    );
  }, []);

  return (
    <div className="App">
      <h1>Hello CodeSandbox</h1>
      <svg viewBox="0 0 150 33.2" width="180" height="150">
        <circle ref={circle} cx="16.1" cy="16.6" r="16.1" fill="#527abd" />
      </svg>
    </div>
  );
}
Ví dụ 2 :
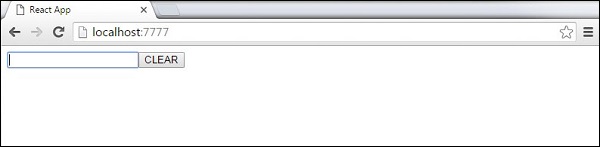
Ví dụ này hướng dẫn bạn cách sử dụng refs để xoá box input. Hàm ClearInput sẽ tìm phần tử với ref = giá trị "myInput"App.jsx
import React from 'react';
import ReactDOM from 'react-dom';

class App extends React.Component {
   constructor(props) {
      super(props);

      this.state = {
         data: ''
      }
      this.updateState = this.updateState.bind(this);
      this.clearInput = this.clearInput.bind(this);
   };
   updateState(e) {
      this.setState({data: e.target.value});
   }
   clearInput() {
      this.setState({data: ''});
      ReactDOM.findDOMNode(this.refs.myInput).focus();
   }
   render() {
      return (
         <div>
            <input value = {this.state.data} onChange = {this.updateState}
               ref = "myInput"></input>
            <button onClick = {this.clearInput}>CLEAR</button>
            <h4>{this.state.data}</h4>
         </div>
      );
   }
}
export default App;
main.js
import React from 'react';
import ReactDOM from 'react-dom';
import App from './App.jsx';

ReactDOM.render(<App/>, document.getElementById('app'));
Cứ sau một lần bạn nhấn vào nútCLEARthì input sẽ bị xoá đi
Theo dõi VnCoder trên Facebook, để cập nhật những bài viết, tin tức và khoá học mới nhất!
- Bài 1: ReactJS - Lời mở đầu
- Bài 2: ReactJS - Thiết lập môi trường
- Bài 3: ReactJS - JSX
- Bài 4: ReactJS - Components & State
- Bài 5: Props - Tổng quan
- Bài 6: Props - Validation
- Bài 7: ReactJJS - Component API
- Bài 8: ReactJS - Vòng đời của Component
- Bài 9: ReactJS - Forms
- Bài 10: ReactJS - Xử lý sự kiện
- Bài 11: ReactJS - Refs
- Bài 12: ReactJS - List và Keys
- Bài 13: ReactJS - Router
- Bài 14: ReactJS - Khái niệm Flux
- Bài 15: ReactJS - Cách sử dụng Flux
- Bài 16: ReactJS - Animation
- Bài 17: ReactJS - Higher Order Components
- Bài 18: ReactJS - Bản rút gọn(Quick guide - P1)
- Bài 19: ReactJS - Bản rút gọn(Quick guide - P2)
- Bài 20: ReactJS - Bản rút gọn(Quick guide - P3)
- Bài 21: ReactJS - Tạo ứng dụng reatjs từ bootstrap 4