- Bài 1: ReactJS - Lời mở đầu
- Bài 2: ReactJS - Thiết lập môi trường
- Bài 3: ReactJS - JSX
- Bài 4: ReactJS - Components & State
- Bài 5: Props - Tổng quan
- Bài 6: Props - Validation
- Bài 7: ReactJJS - Component API
- Bài 8: ReactJS - Vòng đời của Component
- Bài 9: ReactJS - Forms
- Bài 10: ReactJS - Xử lý sự kiện
- Bài 11: ReactJS - Refs
- Bài 12: ReactJS - List và Keys
- Bài 13: ReactJS - Router
- Bài 14: ReactJS - Khái niệm Flux
- Bài 15: ReactJS - Cách sử dụng Flux
- Bài 16: ReactJS - Animation
- Bài 17: ReactJS - Higher Order Components
- Bài 18: ReactJS - Bản rút gọn(Quick guide - P1)
- Bài 19: ReactJS - Bản rút gọn(Quick guide - P2)
- Bài 20: ReactJS - Bản rút gọn(Quick guide - P3)
- Bài 21: ReactJS - Tạo ứng dụng reatjs từ bootstrap 4
Bài 10: ReactJS - Xử lý sự kiện - Học ReactJS Full Đầy Đủ Nhất
Đăng bởi: Admin | Lượt xem: 4035 | Chuyên mục: Javascript
Trong bài hôm nay, ta sẽ cùng tìm hiểu về cách sử dụng Events(Sự kiện) trong ReactJS. Điều này không khác biệt so với event JS
Trong Javascript bạn sẽ xử lý sự kiện trong một hàm, còn trong React bạn sẽ xử lý sự kiện trong một phương thức của Component.
1. Cài đặt môi trường :
Khởi tạo project thông qua lệnh
npm install -g create-react-app

create-react-app myProject
2. Gọi và xử lý sự kiện (Handling Event) trong Reactjs :
a. Sự kiện không truyền tham số :
//App.js
import React, { Component } from 'react';
import './App.css';
import Product from './components/Product';

class App extends Component {
    onClickMe() {
        alert('hello world cup');
    }
    render() {
        return (
            <div>
                 <button type="button" className="btn btn-default" onClick={ this.onClickMe }>
                        Click Me !
                 </button>
            </div>
        );
    }
}

export default App;
Sau đó bạn mở cmd (hoặc terminal) lên vào thư mục đang chứa project chạy lện npm start và Click thử vào button "Click Me !" thì bạn sẽ nhận được một cái popup với nội dung là "hello world cup".
Vấn đề đặt ra là cái "onClick" kia lấy ở đâu ra thì bạn có thể truy cập vào trang này thì tại đây reacjs có hỗ trợ chúng ta rất là nhiều event như: onChange, onSubmit...
b. Sự kiện truyền có thêm tham số :
Cách 1: Sử dụng hàm bind để truyền tham số :
Ví dụ 1: bind tham số trực tiếp ở hàm:
//App.js
import React, { Component } from 'react';
import './App.css';
import Product from './components/Product';

class App extends Component {
    onClick(text) {
        alert(text);
    }
    render() {
        return (
            <div>
                 <button type="button" className="btn btn-default" onClick={ this.onClickMe.bind(this, 'Ahihi') }>
                    Click Me !
                 </button>
            </div>
        );
    }
}

export default App;
Ví dụ 2: bind tham số ở trên hàm constructor:
//App.js
import React, { Component } from 'react';
import './App.css';
import Product from './components/Product';

class App extends Component {

    constructor(props) {
        super(props);
        this.onClickMe = this.onClickMe.bind(this, 'Ahihi')
    }

    onClick(text) {
        alert(text);
    }
    render() {
        return (
            <div>
                 <button type="button" className="btn btn-default" onClick={ this.onClickMe }>
                    Click Me !
                 </button>
            </div>
        );
    }
}
Khi chạy lên cả hai ví dụ trên và click vào button thì đều có cùng kết quả là "Ahihi".

Cách 2: Sử dụng arrow function trong Es6
//App.js
import React, { Component } from 'react';
import './App.css';
import Product from './components/Product';

class App extends Component {
    onClick(text) {
        alert(text);
    }
    render() {
        return (
            <div>
                 <button type="button" className="btn btn-default" onClick={ () =>  this.onClickMe('Ahihi') }>
                    Click Me !
                 </button>
            </div>
        );
    }
}
Chạy chương trình lên và click vào button thì kết quả cũng giống hai ví dụ trên dều nhận được là "Ahihi"
3. Các ví dụ :
Ví dụ đơn giản
Ứng dụng dùng để refresh chính xác thời gian
Ta tạo tạo file jsx như ở
dưới
onClick-example.
jsx
class CurrentTime extends React.Component {
  constructor(props) {
    super(props);

    var now = new Date();
    this.state = {
      currentTime: now.toString()
    };
  }

  // A method of CurrentTime component
  refreshCurrentTime() {
    var now = new Date();
    this.setState({ currentTime: now.toString() });
  }
  render() {
    return (
      <div>
        <h4>Current Time:</h4>
        <p>{this.state.currentTime}</p>
        <button onClick={() => this.refreshCurrentTime()}>
          Refresh Current Time
        </button>
      </div>
    );
  }
}

// Render
ReactDOM.render(<CurrentTime />, document.getElementById("currenttime1"));
onClick-example.html
<!DOCTYPE html>
<html lang="en">
   <head>
      <meta charset="UTF-8">
      <title>ReactJS Event</title>
      <script src="https://unpkg.com/react@16.4.2/umd/react.production.min.js"></script>
      <script src="https://unpkg.com/react-dom@16.4.2/umd/react-dom.production.min.js"></script>
      <script src="https://unpkg.com/babel-standalone@6.26.0/babel.min.js"></script>
      <style>
         #currenttime1 {
         border:1px solid blue;
         padding: 5px;
         margin-top: 20px;
         }
      </style>
   </head>
   <body>
      <h3>ReactJS Event: onClick</h3>

      <div id="currenttime1"></div>

      <script src="onClick-example.jsx" type="text/babel"></script>

   </body>
</html>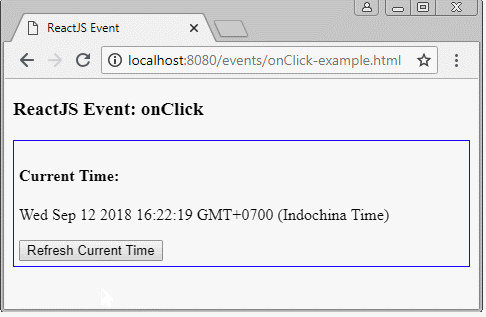
Ở ví dụ tiếp theo ta có sử dụng arrow function như ở trên
các bạn xem đoạn code sau để hiểu rõ hơn :
// Normal function with parameters
var myfunc = function(param1, param2)  {
   // Statements
};

// Arrow function with parameters.
var arrfunc = (param1, param2) => {
   // Statements
};


// Normal function without paramters.
var myfunc2 = function( )  {
   // Statements
};

// Arrow function without parameters.
var arrfunc2 = ( ) => {
   // Statements
};

// If function have only one statement.
var arrfunc2 = ( ) => singleStatement;
onClick, onChange,..
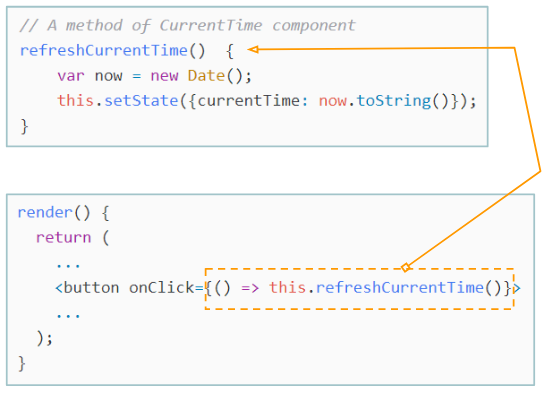
onClick phải gọi đến một hàm Javascript, nó không thể gọi trực tiếp đến một phương thức của Component. Vì vậy onClick nên gọi đến một hàm nặc danh (anonymous), và bên trong hàm nặc danh này bạn có thể gọi đến phương thức của Component:
Arrow function với tham số event:
// A method of Component with event parameter.
refreshCurrentTime(event) {
  var now = new Date();
  this.setState({ currentTime: now.toString() });
}

render() {
  return (
    <div>
      <h4>Current Time:</h4>
      <p>{this.state.currentTime}</p>
      <button onClick={(event) => this.refreshCurrentTime(event)}>
          Refresh Current Time
      </button>
    </div>
  );
}
Với Javascript ES6 bạn cũng có thể gọi đến phương thức của Component theo cách sau:
example.jsx
// A method of this Component.
refreshCurrentTime(event) {
  var now = new Date();
  this.setState({ currentTime: now.toString() });
}

render() {
  return (
    <div>
      <h4>Current Time:</h4>
      <p>{this.state.currentTime}</p>
      <button onClick={this.refreshCurrentTime.bind(this,event)}>
         Refresh Current Time
      </button>
    </div>
  );
}
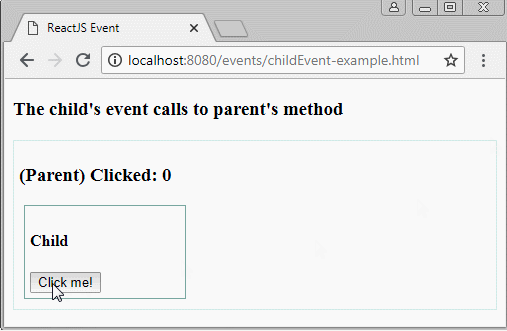
Event của Component con
Một sự kiện xẩy ra tại Component con, nhưng bạn muốn gọi đến một phương thức tại Componen cha, dưới đây là một ví dụ như thế.
childEvent-example.jsx
// <Child> with 1 attribute: myClickHandler
// <Child myClickHandler=.. />
class Child extends React.Component {
  render() {
    return (
      <div className="child">
        <h4>Child</h4>
        <button onClick={this.props.myClickHandler}>Click me!</button>
      </div>
    );
  }
}

class Parent extends React.Component {
  constructor(props) {
    super(props);

    this.state = {
      count: 0
    };
  }

  myMethodOfParent() {
    this.setState((prevState, props) => {
      return {
        count: prevState.count + 1
      };
    });
  }

  render() {
    return (
      <div className="parent">
        <h3>(Parent) Clicked: {this.state.count} </h3>
        <Child myClickHandler={() => this.myMethodOfParent()} />
      </div>
    );
  }
}

// Render
ReactDOM.render(<Parent />, document.getElementById("placeholder1"));
childEvent-example.html
<!DOCTYPE html>
<html lang="en">
   <head>
      <meta charset="UTF-8">
      <title>ReactJS Event</title>
      <script src="https://unpkg.com/react@16.4.2/umd/react.production.min.js"></script>
      <script src="https://unpkg.com/react-dom@16.4.2/umd/react-dom.production.min.js"></script>
      <script src="https://unpkg.com/babel-standalone@6.26.0/babel.min.js"></script>
      <style>
         .parent {
         border:1px solid #d9ebe8;
         padding: 5px;
         margin-top: 20px;
         }
         .child {
         width:150px;
         border:1px solid #8cb0aa;
         margin: 5px;
         padding: 5px;
         }
      </style>
   </head>
   <body>
      <h3>The child's event calls to parent's method</h3>

      <div id="placeholder1"></div>

      <script src="childEvent-example.jsx" type="text/babel"></script>

   </body>
</html>
Ta tiếp tục với ví dụ đơn giản sau để hiểu hơn cách sử dụng 1 component. Ta sẽ thêm sự kiện onClick ở bên trong hàm updateState mỗi khi ta nhấn vào button
App.jsx
import React from 'react';

class App extends React.Component {
   constructor(props) {
      super(props);

      this.state = {
         data: 'Initial data...'
      }
      this.updateState = this.updateState.bind(this);
   };
   updateState() {
      this.setState({data: 'Data updated...'})
   }
   render() {
      return (
         <div>
            <button onClick = {this.updateState}>CLICK</button>
            <h4>{this.state.data}</h4>
         </div>
      );
   }
}
export default App;
main.js
import React from 'react';
import ReactDOM from 'react-dom';
import App from './App.jsx';

ReactDOM.render(<App/>, document.getElementById('app'));
Kết quả như sau :

Sự kiện con
Khi chúng ta cần cập nhật trạng thái của component cha từ component con, ta có thể tạo ra sự kiên handler (updateState) trong component cha và gọi ra bằng prop(updateStateProp) để gọi tham số đến component con
App.jsx
import React from 'react';

class App extends React.Component {
   constructor(props) {
      super(props);

      this.state = {
         data: 'Initial data...'
      }
      this.updateState = this.updateState.bind(this);
   };
   updateState() {
      this.setState({data: 'Data updated from the child component...'})
   }
   render() {
      return (
         <div>
            <Content myDataProp = {this.state.data}
               updateStateProp = {this.updateState}></Content>
         </div>
      );
   }
}
class Content extends React.Component {
   render() {
      return (
         <div>
            <button onClick = {this.props.updateStateProp}>CLICK</button>
            <h3>{this.props.myDataProp}</h3>
         </div>
      );
   }
}
export default App;
main.js
import React from 'react';
import ReactDOM from 'react-dom';
import App from './App.jsx';

ReactDOM.render(<App/>, document.getElementById('app'));
Kết quả như sau :

Bây giờ chúng ta

Theo dõi VnCoder trên Facebook, để cập nhật những bài viết, tin tức và khoá học mới nhất!
- Bài 1: ReactJS - Lời mở đầu
- Bài 2: ReactJS - Thiết lập môi trường
- Bài 3: ReactJS - JSX
- Bài 4: ReactJS - Components & State
- Bài 5: Props - Tổng quan
- Bài 6: Props - Validation
- Bài 7: ReactJJS - Component API
- Bài 8: ReactJS - Vòng đời của Component
- Bài 9: ReactJS - Forms
- Bài 10: ReactJS - Xử lý sự kiện
- Bài 11: ReactJS - Refs
- Bài 12: ReactJS - List và Keys
- Bài 13: ReactJS - Router
- Bài 14: ReactJS - Khái niệm Flux
- Bài 15: ReactJS - Cách sử dụng Flux
- Bài 16: ReactJS - Animation
- Bài 17: ReactJS - Higher Order Components
- Bài 18: ReactJS - Bản rút gọn(Quick guide - P1)
- Bài 19: ReactJS - Bản rút gọn(Quick guide - P2)
- Bài 20: ReactJS - Bản rút gọn(Quick guide - P3)
- Bài 21: ReactJS - Tạo ứng dụng reatjs từ bootstrap 4

