


- Bài 1: Thiết kế Database
- Bài 2: Xây dựng bố cục thư mục
- Bài 3: Tạo kết nối với CSDL
- Bài 4: Thiết kế giao diện cho trang Admin
- Bài 5: Làm chức năng đăng ký
- Bài 6: Làm chức năng đăng nhập cho người dùng
- Bài 7: Làm chức năng đăng nhập Admin
- Bài 8: Làm chức năng đăng xuất
- Bài 9: Thêm chuyên mục
- Bài 10: Làm chức năng sửa chuyên mục và hiển thị danh sách chuyên mục
- Bài 11: Làm chức năng thêm bài viết
- Bài 12: Làm chức năng hiển thị danh sách bài viết
- Bài 13: Làm chức năng sửa và xóa bài viết
Bài 13: Làm chức năng sửa và xóa bài viết - Xây dựng Website PHP theo MVC
Đăng bởi: Admin | Lượt xem: 7604 | Chuyên mục: PHP
Trong bài trước chúng ta đã làm chức năng hiển thị danh sách bài viết. Tiếp theo trong bài này, chúng ta sẽ viết tiếp 2 chức năng sửa và xóa bài viết để hoàn tất module bài viết.
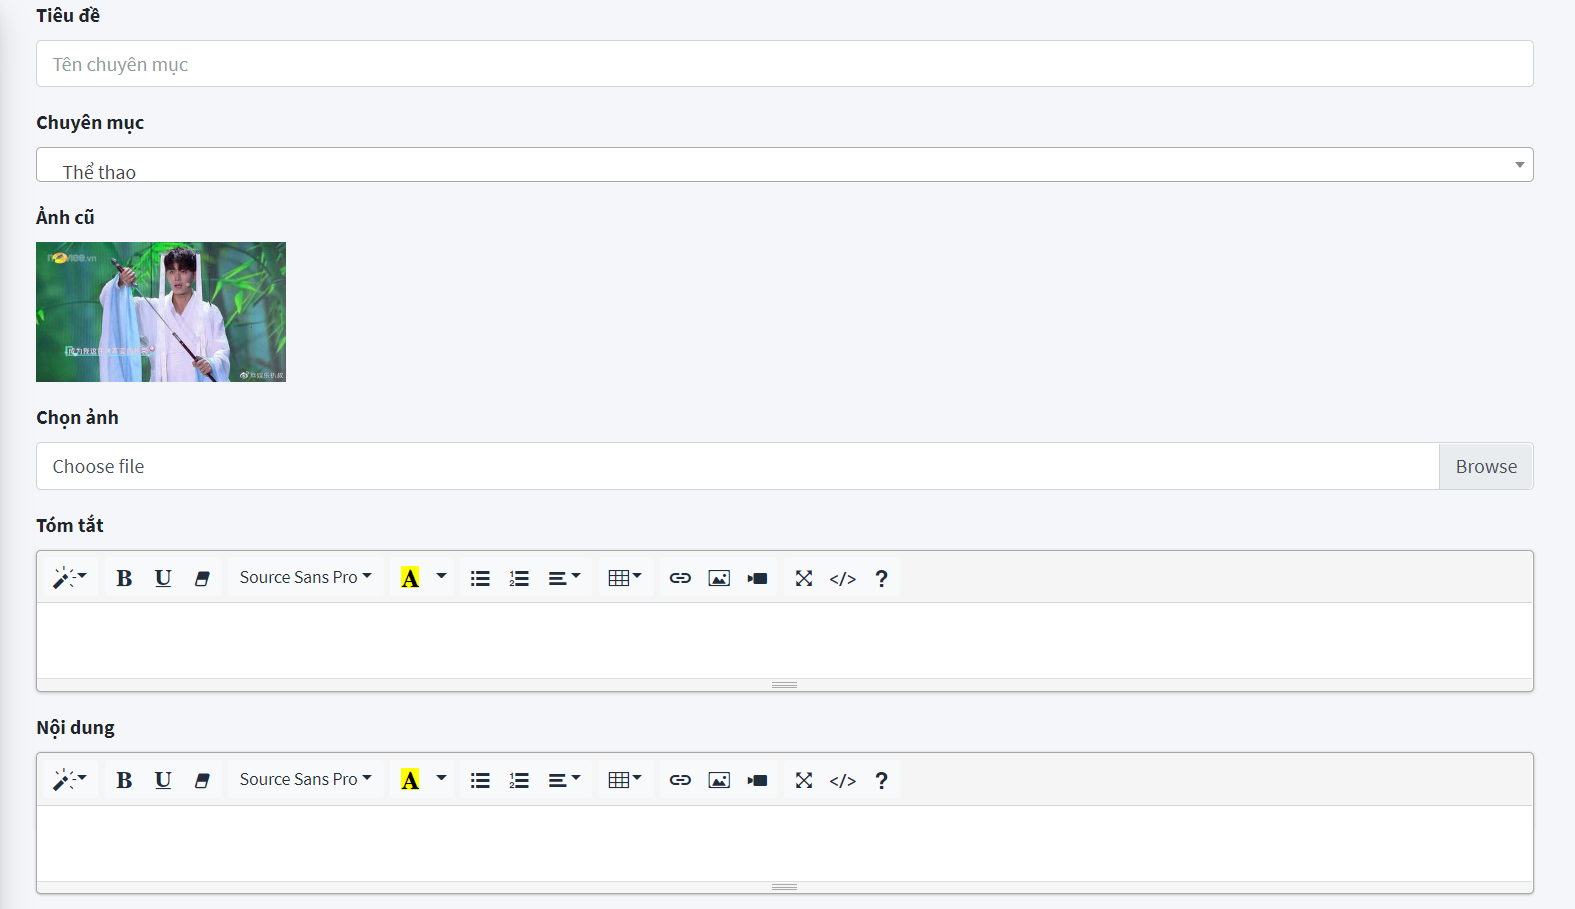
1) Thiết kế giao diện
Vì là trang chỉnh sửa bài viết, nên nội dung của chúng có phần sẽ giống với phần thêm bài viết, chỉ khác là các ô nhập liệu giờ đây đã có dữ liệu. Dữ liệu này chúng ta tiến hành lấy từ cơ sở dữ liệu thông qua biến truyền mà ở danh sách bài viết đã gửi editPost.php?postId=$id. Biến $id sẽ là giá trị id của bài viết mà chúng ta truyền vào.
Tạo file View/admin/pages/post/edit.php:
<div class="content-wrapper" style="min-height: 353px;">
    <div class="content-header">
        <div class="container-fluid">
            <div class="row mb-2">
                <div class="col-sm-6">
                    <h1 class="m-0 text-dark">Sửa bài viết</h1>
                </div><!-- /.col -->
                <div class="col-sm-6">
                    <ol class="breadcrumb float-sm-right">
                        <li class="breadcrumb-item"><a href="#">Bài viết</a></li>
                        <li class="breadcrumb-item active">Admin</li>
                    </ol>
                </div>
            </div>
        </div>
    </div>
    <section class="content">
        <div class="container-fluid">
            <form method="post" enctype="multipart/form-data">
                <div class="card-body">
                    <div class="form-group">
                        <label>Tiêu đề</label>
                        <input type="text" required="required" name="title" class="form-control" placeholder="Tên chuyên mục">
                    </div>
                    <div class="form-group">
                        <label>Chuyên mục</label>
                        <select name="category_id" class="form-control select2">
                            <option>Thể thao</option>
                        </select>
                    </div>
                    <div class="form-group">
                        <label>Ảnh cũ</label><br>
                        <img width="200px" src="">
                        <input type="hidden" value="" name="image_old">
                    </div>
                    <div class="form-group">
                        <label for="exampleInputFile">Chọn ảnh</label>
                        <div class="input-group">
                          <div class="custom-file">
                            <input type="file" name="image" class="custom-file-input" id="exampleInputFile">
                            <label class="custom-file-label" for="exampleInputFile">Chọn ảnh</label>
                        </div>
                    </div>
                    <div class="form-group">
                        <label>Tóm tắt</label>
                        <textarea class="textarea" name="summary" required="required" placeholder="Place some text here"
                          style="width: 100%; height: 500px; font-size: 14px; line-height: 18px; border: 1px solid #dddddd; padding: 10px;"></textarea>
                    </div>
                    <div class="form-group">
                        <label>Nội dung</label>
                        <textarea required="required" name="content" class="textarea" placeholder="Place some text here"
                          style="width: 100%; height: 500px; font-size: 14px; line-height: 18px; border: 1px solid #dddddd; padding: 10px;"></textarea>
                    </div>
                    <button type="submit" name="editPost" class="btn btn-primary">Hoàn thành</button>
                </div>
            </form>
        </div>
    </section>
</div>
Sau khi thiết kế xong phần giao diện, để hiển thị chúng ta cần require nó trong controller, tạo file Controller/admin/editPost.php:
<?php

class EditPost {
	public function __construct()
	{
		require('pages/post/edit.php');
        }
}
Chạy chương trình theo đường dẫn: http://localhost/blog/View/admin/?controller=editPost&postId=$id để xem kết quả, biến $id sẽ là id bài viết mà bạn muốn chỉnh sửa.
2) Làm chức năng sửa bài viết
2.1 Hiển thị dữ liệu cũ
Để tiện cho việc chỉnh sửa, chúng ta cần in những nội dung cũ mà ta đã thêm trước đó vào form chỉnh sửa. Viết hàm getPost trong file để thực hiện thao tác lấy dữ liệu bài viết theo id.
public function getPost($postId)
	{
		$sql = "SELECT * FROM posts WHERE id = $postId";
		$result = $this->db->conn->query($sql);
		$data = $result->fetch_array();

		return $data;
Ta thấy trong form sửa bài viết có mục chọn chuyên mục, để hiện thị toàn bộ chuyên mục thì chúng ta cần lấy tất cả chuyên mục có trong CSDL, sửa file Controller/admin/editPost thành:
<?php

class EditPost {
	public function __construct()
	{
		require_once('../../Model/admin/category.php');
		require_once('../../Model/admin/post.php');

		$categoryModel = new categoryModel;
		$postModel = new PostModel;

		if (isset($_GET['postId'])) {
			$postId = $_GET['postId'];
			$categories = $categoryModel->categoryList(); /*lấy toàn bộ chuyên mục trong bảng categories*/
			$postOld = $postModel->getPost($postId);

			require('pages/post/edit.php');
		}
	}
}
Hiển thị dữ liệu cũ trong form chỉnh sửa bài viết, khi đó file View/admin/pages/post/edit.php trở thành:
<div class="content-wrapper" style="min-height: 353px;">
    <div class="content-header">
        <div class="container-fluid">
            <div class="row mb-2">
                <div class="col-sm-6">
                    <h1 class="m-0 text-dark">Sửa bài viết</h1>
                </div><!-- /.col -->
                <div class="col-sm-6">
                    <ol class="breadcrumb float-sm-right">
                        <li class="breadcrumb-item"><a href="#">Bài viết</a></li>
                        <li class="breadcrumb-item active">Admin</li>
                    </ol>
                </div>
            </div>
        </div>
    </div>
    <section class="content">
        <div class="container-fluid">
            <form method="post" enctype="multipart/form-data">
                <div class="card-body">
                    <div class="form-group">
                        <label>Tiêu đề</label>
                        <input value="<?=$postOld['title']?>" type="text" required="required" name="title" class="form-control" placeholder="Tên chuyên mục">
                    </div>
                    <div class="form-group">
                        <label>Chuyên mục</label>
                        <select name="category_id" class="form-control select2">
                            <?php
                                foreach ($categories as $category) {?>
                                    <option <?php if ($category['id'] == $postOld['category_id']) {echo "selected";} ?> value="<?=$category['id']?>">
                                        <?=$category['name']?>
                                    </option>
                                <?php }
                            ?>
                            <option>Thể thao</option>
                        </select>
                    </div>
                    <div class="form-group">
                        <label>Ảnh cũ</label><br>
                        <img width="200px" src="../../Public/upload/posts/<?=$postOld['image']?>">
                        <input type="hidden" value="<?=$postOld['image']?>" name="iamge_old">
                    </div>
                    <div class="form-group">
                        <label for="exampleInputFile">Chọn ảnh</label>
                        <div class="input-group">
                          <div class="custom-file">
                            <input type="file" name="image" class="custom-file-input" id="exampleInputFile">
                            <label class="custom-file-label" for="exampleInputFile">Chọn ảnh</label>
                        </div>
                    </div>
                </div>
                <div class="form-group">
                    <label>Tóm tắt</label>
                    <textarea class="textarea" name="summary" required="required" placeholder="Place some text here"
                    style="width: 100%; height: 500px; font-size: 14px; line-height: 18px; border: 1px solid #dddddd; padding: 10px;"><?=$postOld['summary']?></textarea>
                </div>
                <div class="form-group">
                    <label>Nội dung</label>
                    <textarea required="required" name="content" class="textarea" placeholder="Place some text here"
                    style="width: 100%; height: 500px; font-size: 14px; line-height: 18px; border: 1px solid #dddddd; padding: 10px;"><?=$postOld['content']?></textarea>
                </div>
                <button type="submit" name="editPost" class="btn btn-primary">Hoàn thành</button>
            </div>
        </form>
    </div>
</section>
</div>
2.2 Làm chức năng sửa bài viết
Sau khi đã làm xong các bước ở trên, cuối cùng chúng ta bắt tay vào làm chức năng sửa bài viết. Viết hàm editPost bên Model, hàm này có chức năng chỉnh sửa bài viết trong file Model/admin/post.php:
public function editPost($id, $title, $slug, $summary, $content, $categoryId, $image)
	{
		$title = $this->db->conn->real_escape_string($title);
		$slug = $this->db->conn->real_escape_string($slug);
		$summary = $this->db->conn->real_escape_string($summary);
		$content = $this->db->conn->real_escape_string($content);
		$sql = "UPDATE posts SET title = '$title',
								 slug = '$slug',
								 summary = '$summary',
								 content = '$content',
								 category_id = '$categoryId',
								 image = '$image'
							 WHERE id = $id
								 ";

		return $this->db->conn->query($sql);
	}
Bên Controller thực hiện lấy giữ từ form, khi đó file Controller/admin/editPost.php trở thành:
<?php

class EditPost {
	public function __construct()
	{
		require_once('../../Model/admin/category.php');
		require_once('../../Model/admin/post.php');

		$categoryModel = new categoryModel;
		$postModel = new PostModel;

		if (isset($_GET['postId'])) {
			$postId = $_GET['postId'];
			$categories = $categoryModel->categoryList(); /*lấy toàn bộ chuyên mục trong bảng categories*/
			$postOld = $postModel->getPost($postId);

			if (isset($_POST['editPost'])) {
				$title = $_POST['title'];
				$slug = changeTitle($title);
				$summary = $_POST['summary'];
				$content = $_POST['content'];
				$categoryId = $_POST['category_id'];
			/**
	        * Nếu không chọn ảnh thì lấy tên ảnh trong input có name là image_old
	        * Ngược lại thì lấy tên ảnh theo $slug và lưu vào Public/upload/post
	        * Tiến hành sửa bài viết bằng hàm editPost bên Model
	        * @var array
	        */
				if (isset($_FILES['image']) && $_FILES['image']['error'] > 0) {
					$image = $_POST['image_old'];
				} else {
					$ext = pathinfo($_FILES['image']['name'], PATHINFO_EXTENSION);
					$image = $slug . '.' . $ext;
					move_uploaded_file($_FILES['image']['tmp_name'], '../../Public/upload/posts/' . $image);
				}

				$postModel->editPost($postId, $title, $slug, $summary, $content, $categoryId, $image);
			}

			require('pages/post/edit.php');
		}
	}
}
Như vậy mình đã hướng dẫn các bạn hoàn thành chức năng sửa bài viết. Nếu có gì không hiểu hãy comment bên dưới để được giải đáp. Chúc các bạn thành công!.
3) Làm chức năng xóa bài viết
Đối với trang xóa dữ liệu, chúng ta cũng không cần phải xử lý quá nhiều. Bởi nhiệm vụ của chúng chỉ đơn giản là xóa đi những dòng trong bảng.
Và thực thi hàm deletePost trong file Model/admin/post.php:
public function deletePost($postId)
	{
		$sql = "DELETE FROM posts WHERE id = $postId";

		return $this->db->conn->query($sql);
	}
Tiếp theo bên Controller, gọi hàm deletePost để thực hiện xóa bài viết, tạo file Controller/admin/deletePost.php và thưc thi các lệnh sau:
<?php

class DeletePost {
	public function __construct()
	{
		require_once('../../Model/admin/post.php');

		$postModel = new PostModel();

		if (isset($_GET['postId'])) {
			$postId = $_GET['postId'];
			$postModel->deletePost($postId);

			header('Location: ?controller=listPost');
		}
		require('pages/category/add.php');
	}
}
Như vậy mình đã hướng dẫn các bạn hoàn thành chức năng sửa và xóa bài viết. Nếu có gì không hiểu hãy comment bên dưới để được giải đáp.
Chúc các bạn thành công!.
Theo dõi VnCoder trên Facebook, để cập nhật những bài viết, tin tức và khoá học mới nhất!
- Bài 1: Thiết kế Database
- Bài 2: Xây dựng bố cục thư mục
- Bài 3: Tạo kết nối với CSDL
- Bài 4: Thiết kế giao diện cho trang Admin
- Bài 5: Làm chức năng đăng ký
- Bài 6: Làm chức năng đăng nhập cho người dùng
- Bài 7: Làm chức năng đăng nhập Admin
- Bài 8: Làm chức năng đăng xuất
- Bài 9: Thêm chuyên mục
- Bài 10: Làm chức năng sửa chuyên mục và hiển thị danh sách chuyên mục
- Bài 11: Làm chức năng thêm bài viết
- Bài 12: Làm chức năng hiển thị danh sách bài viết
- Bài 13: Làm chức năng sửa và xóa bài viết